How to get Brembo 18z brake calipers (from the Audi Q7, VW Touareg and Porsche Cayenne) onto your Audi A4 (B6/B7)
[ This post is mostly complete – just some additional images to follow ]
Most of this information will also be relevant to other VAG (VW/Audi Group) cars so if you want 18z’ees on your Golf then this will probably help you too but might not cover the specifics or unique issues presented by your particular model.
You will need:
- A pair of Brembo 18Z calipers
- Mercedes ML500 v8 discs (with modified centre bore)
- Brembo 17Z brake pads
- Brembo 17z/18z pad fitting kit
- Audi Q5 (8R) front brake pad wear sensors
- Custom 17Z/18Z bolts with sleeves (bolts may need cutting down to size)
- Audi RS4 (B7) front brake lines (I went for HEL braided lines)
- Cable ties (to secure wear sensor cables)
(Main items linked to where I found them cheapest on ebay – you’re welcome!)
Parts in detail
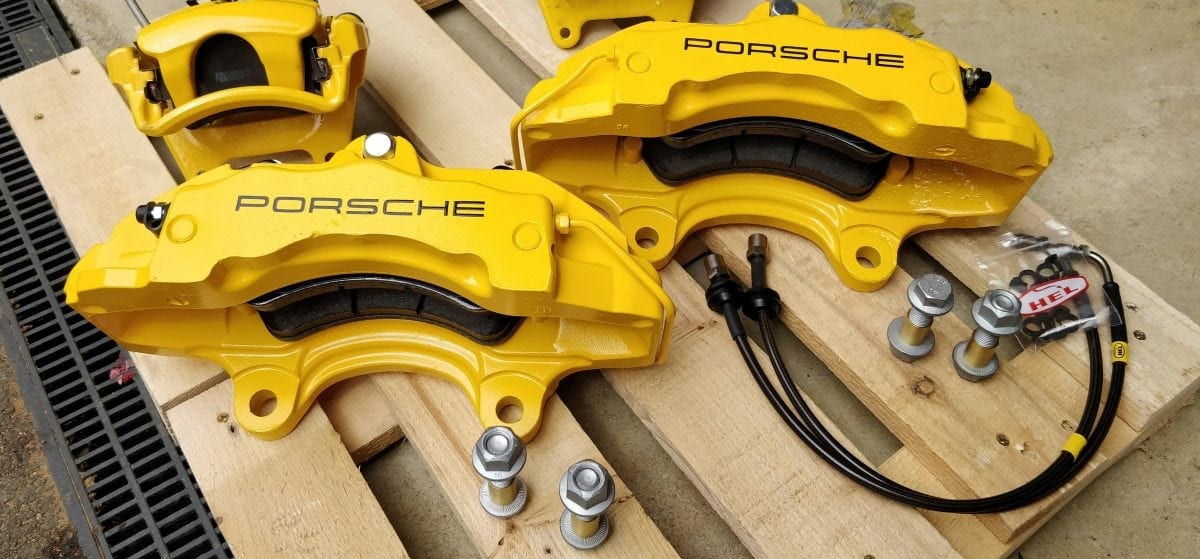
Brembo 18z Calipers
The 18z caliper is a big, modern, and proven caliper designed and manufactured by the braking system Gods themselves, Brembo. It’s an excellent upgrade from most stock brake setups (and the fact they look really cool also helps).
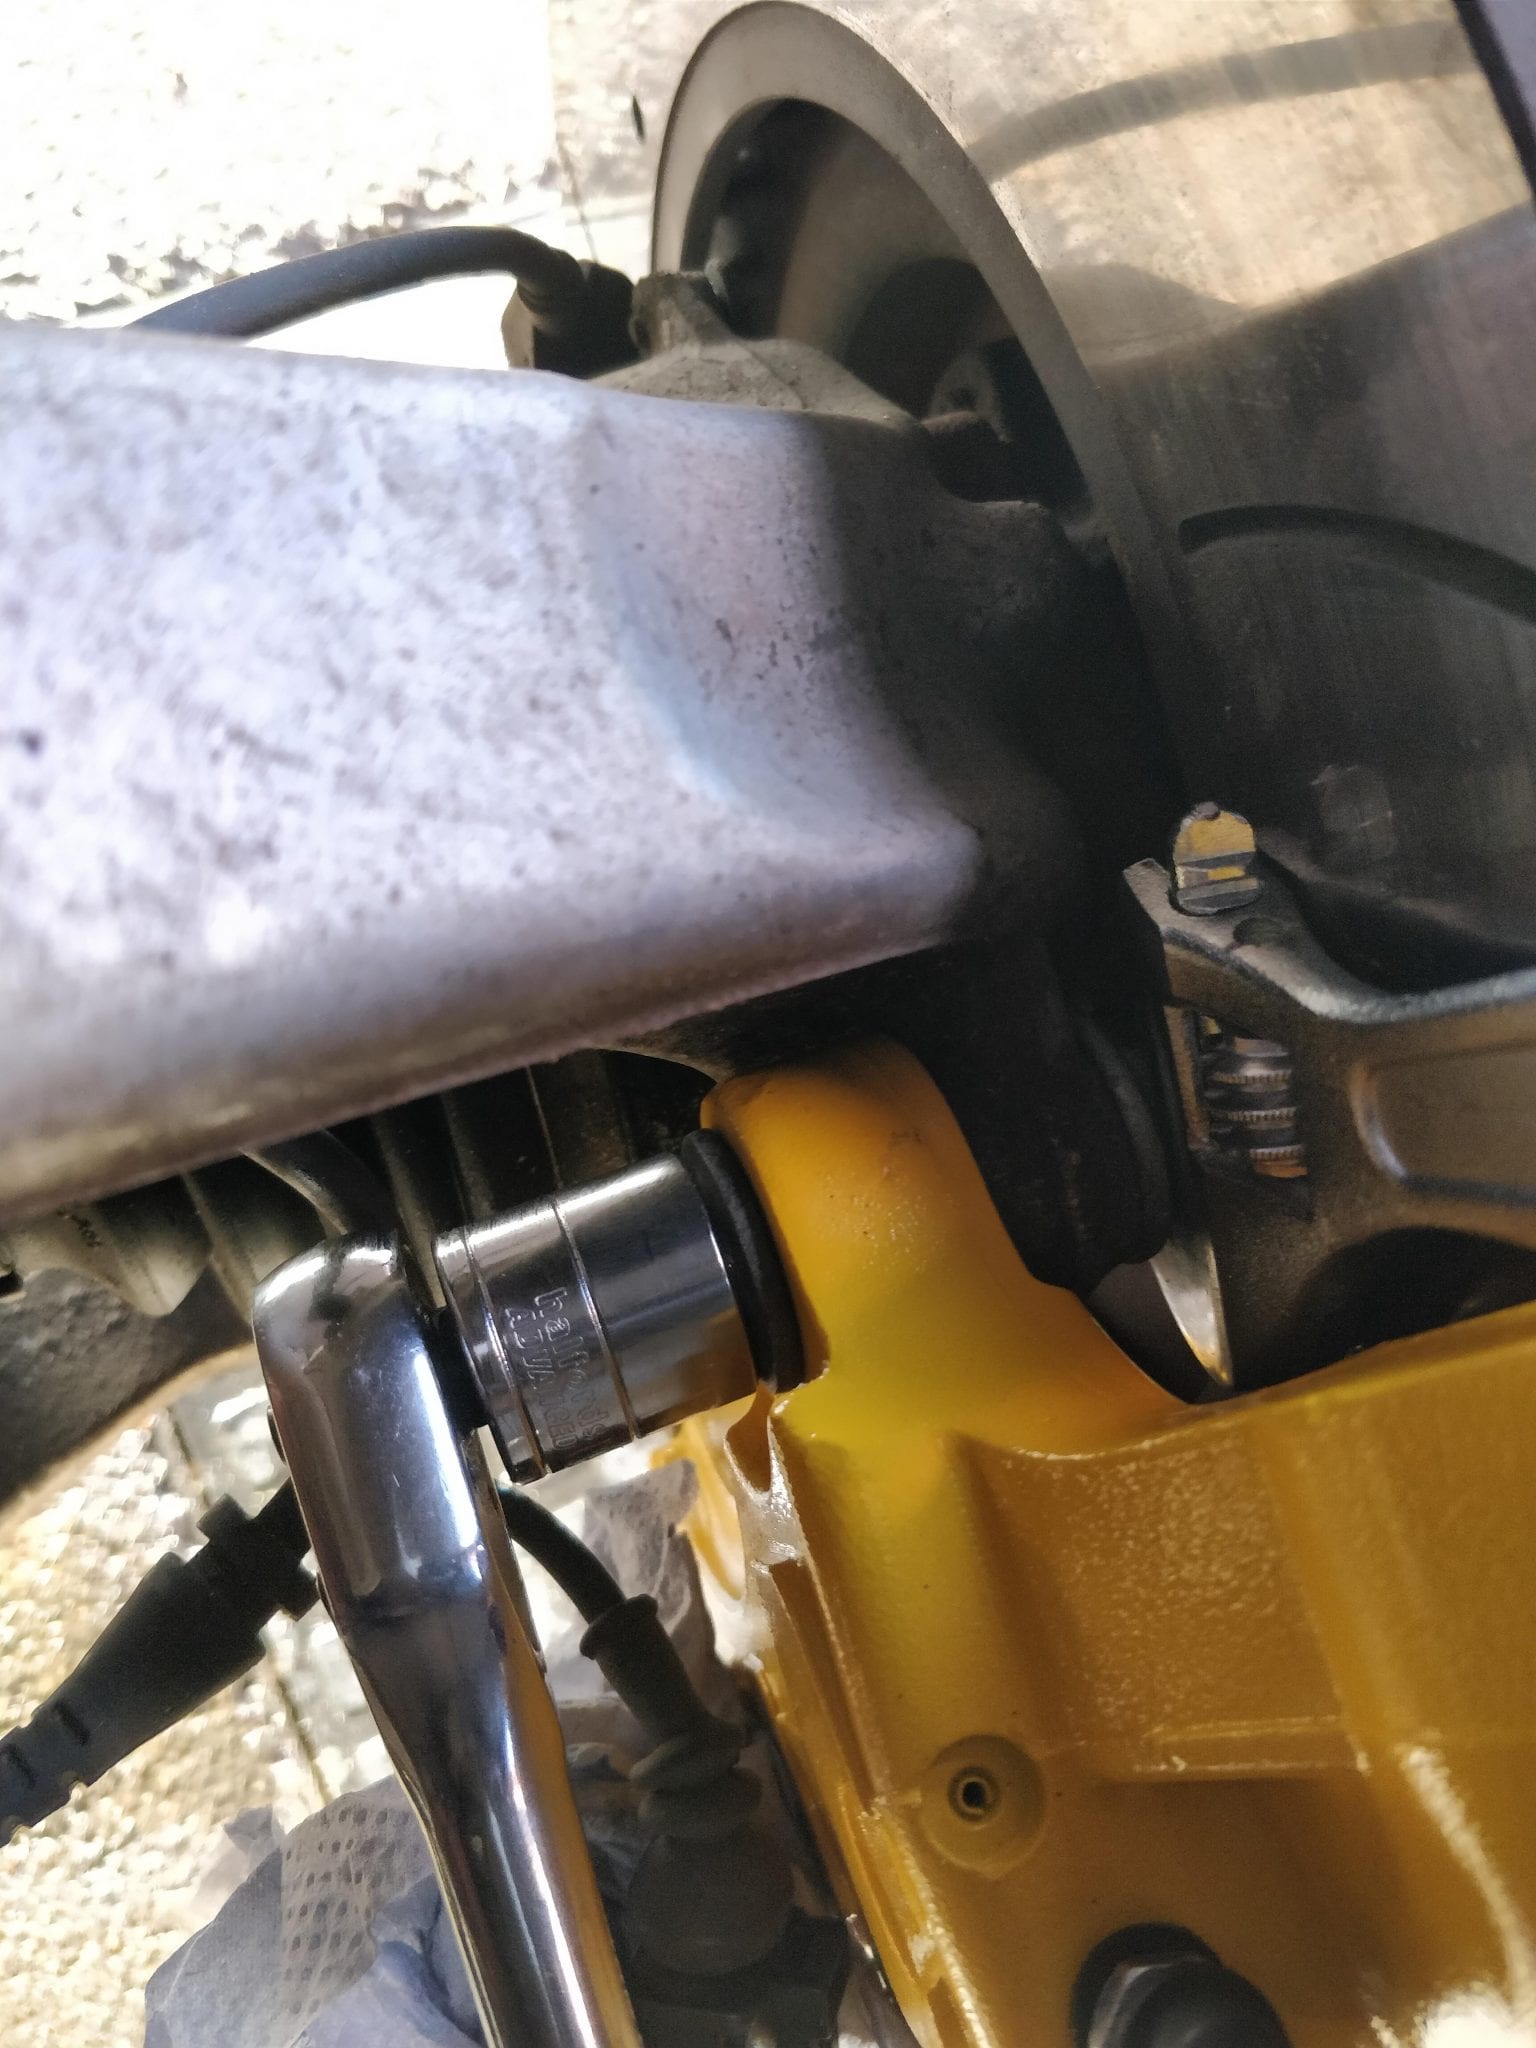
The 18Z caliper for the Q7, Touareg and Cayenne applications all sit forward of the wheel hub. On the A4 they will sit behind and so we need to change some things when sourcing calipers from these vehicles. Each caliper has 6 pistons (“6-pot calipers”), 2 of which are much smaller. This smaller pair of pistons is designed to aid even pad wear and should be the first pair to meet the disc as it turns into the caliper. When mounted forward of the hub this smaller pair are at the top, rearward of the hub they should be at the bottom.
In order for the bleed nipples to remain at the top of the caliper and for the smaller pistons to meet the disc first we need to flip over the caliper link pipes and bleed nipples. This is really straight forward so don’t be scared to do it yourself. If you’re having your calipers refurb’d or powder coated, let them know you want the pipes flipped over before-hand and they’ll do it for you. In all cases I’ve seen the powder coater has coated the calipers with the link pipes in place and you don’t want to damage the finish swapping things afterwards. When tightening bleed screws and link-pipe nuts be careful not to over-tighten, they need only a light nip up (this the professional torque term).
Each calliper is marked “18ZR” and “18ZL” to denote which side it should be mounted. Putting the 18ZR off a Q7 straight onto on the left side of a A4 would technically fit, and the nipples would be at the top but the smaller pistons would be the top pair and the last to meet the disc as it rotates into the caliper, which is wrong. Just be mindful of this and check the markings, pistons and link-pipes for correct orientation before installation.
ML500 345mm x 32mm Discs
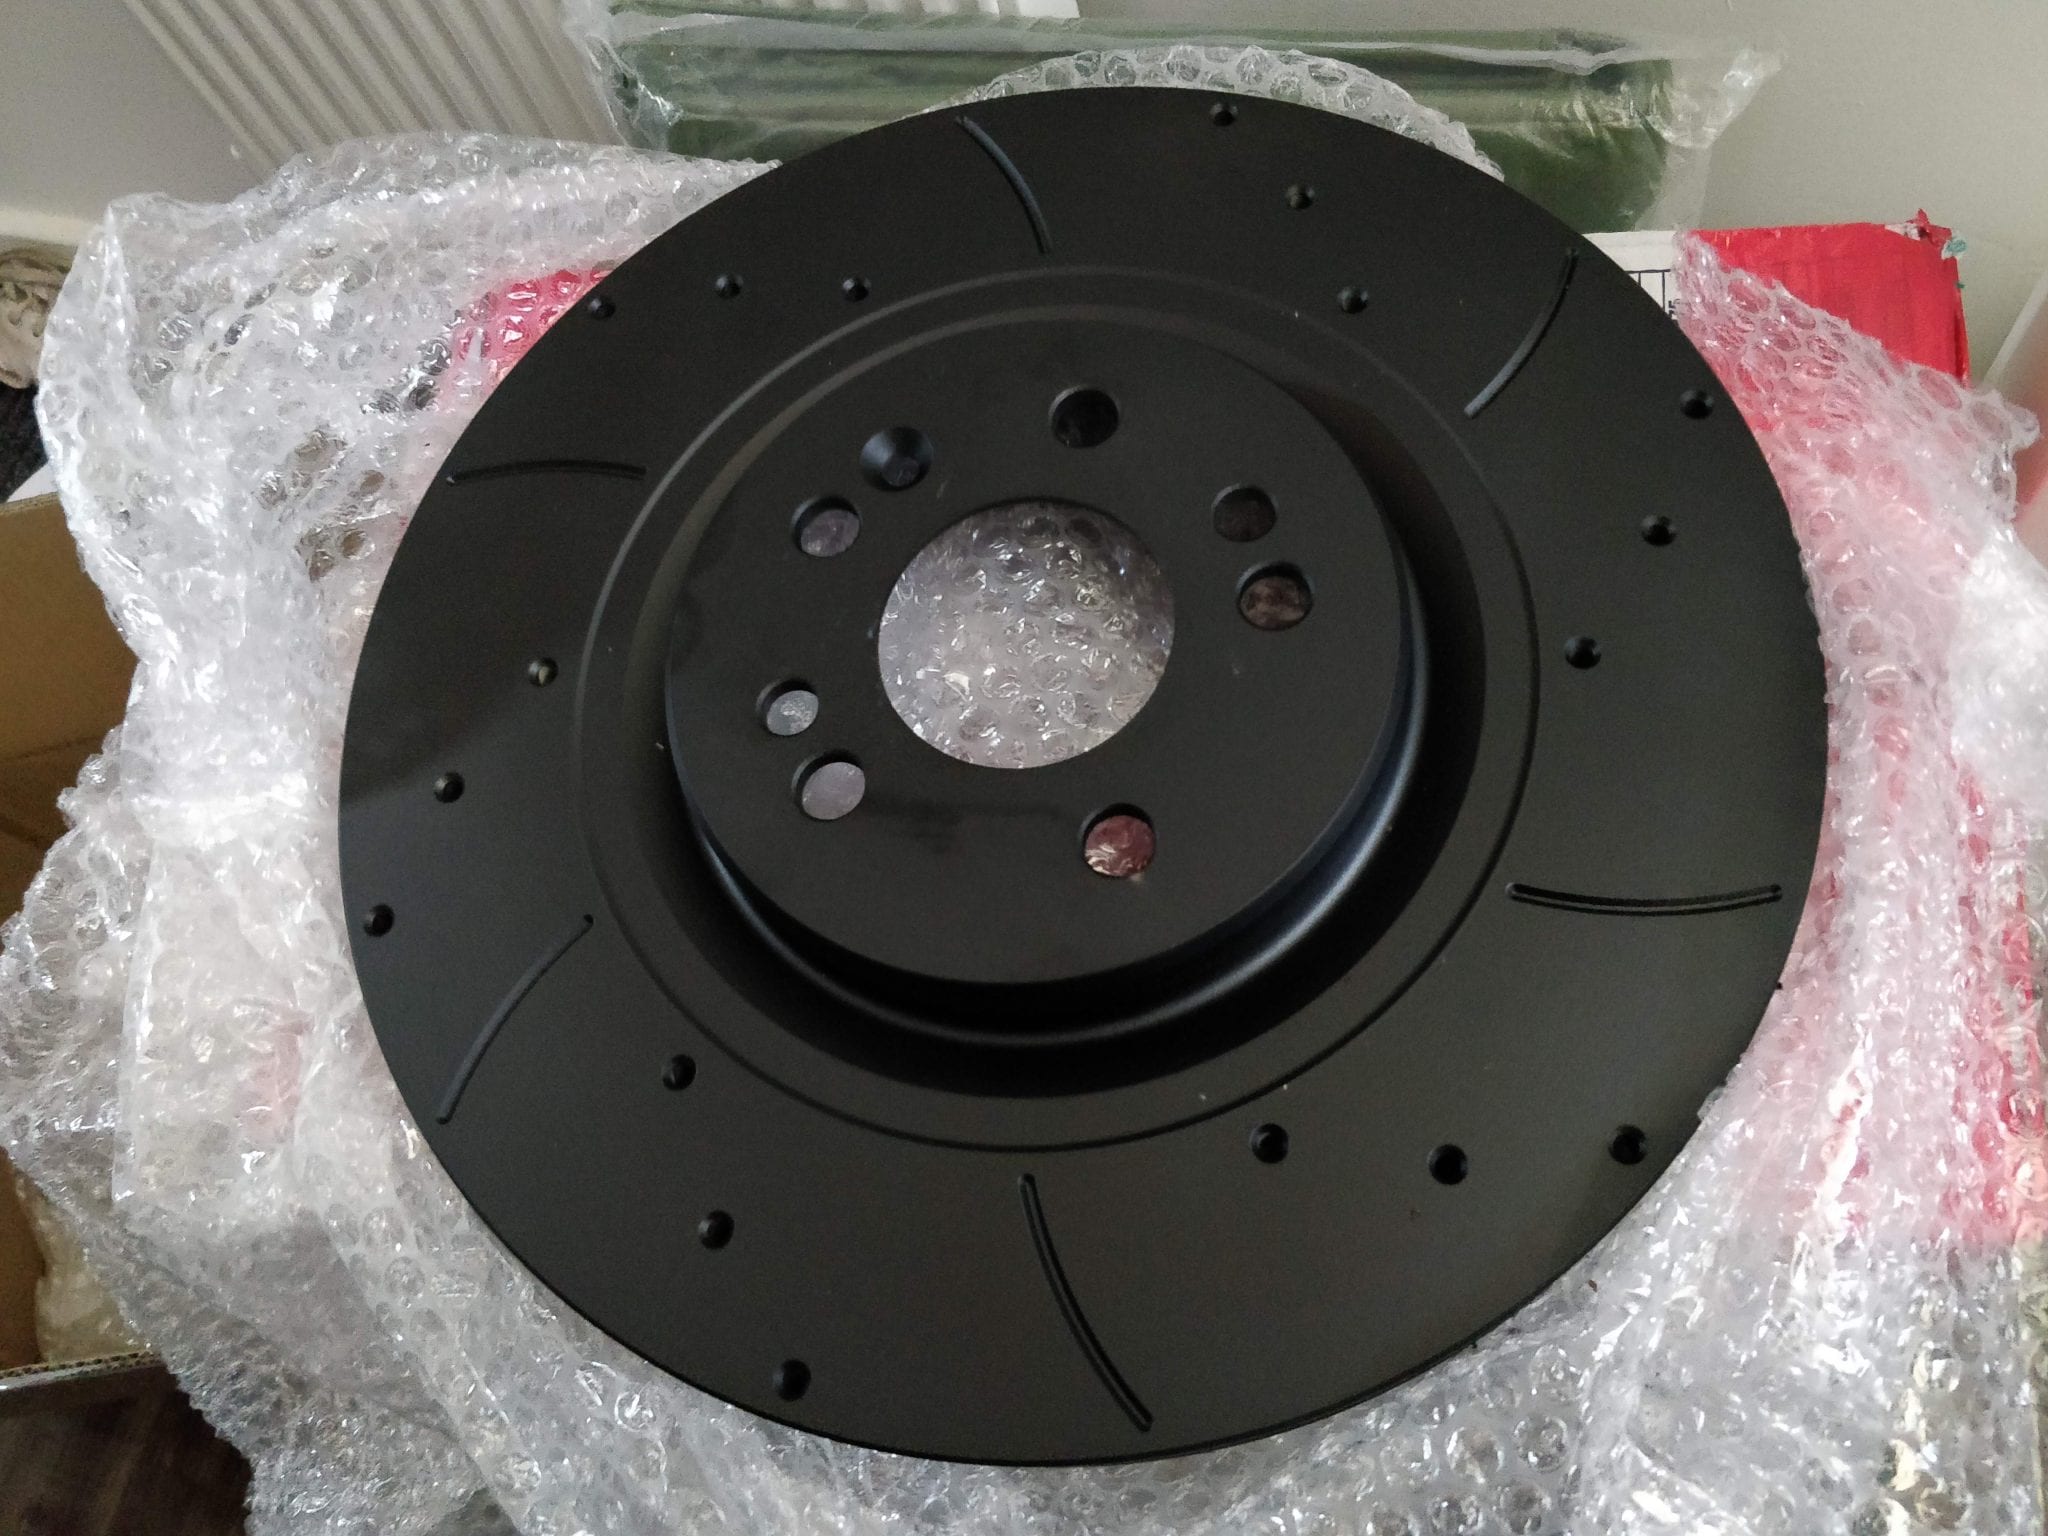
After a lot of research I chose to use the Mercedes ML500 V8 discs because they were the perfect width, offset and reasonably affordable. They are not quite as big as the 18z calipers can accommodate (350mm potential) but still comparatively massive against the standard audi discs. The only issue is the Audi hub is 1mm larger than the Mercedes and so an extra 0.5mm is needed to be machined off the disc centre bore, making it a total of 1mm larger.
I ordered my discs from Mtec and they modified the bore for me. I also had them drilled and grooved and added the optional black protective coating. Obviously this coating wears off the actual braking surface but protects everywhere else from rust and other road crud. All-in with the modification and optional additions I was looking at around £120 for the pair. Given that my B5 RS4 brake discs cost £150 EACH this seemed like a total bargain. For what you get and not having to worry about modifying the centre bore yourself, it is a bargain!
17z Pads
We’re putting 17z pads in our 18z calipers because the ML500 345mm discs are a little smaller diameter that what the 350mm’s 18z’s would usually use. The 17z pads give us a great contact area with the ML500 disc and none of the over-hang we would have got if using 18z pads, plus they’re cheaper too.
17z and 18z pads fit exactly the same so the fitting kit is the same too. I bought a Porsche Cayenne (2002>2010) brake fitting kit specific to Brembo 6-pots.
Pad Wear Sensors
This took a little trial and error to get right. In the end Audi Q5 sensors are what worked. They have the correct male connector, they’re long enough with enough wire connecting the two sensors that they can plug into both pads with no tension on the cable.
Don’t be tricked (like I was) into thinking Touareg 17z wear sensors will work. While they’re long enough and fit the calipers nicely the connector is female so won’t plug into the A4’s loom which is also female. Go for the Q5 (8R chassis) sensors and you’ll be fine.
Upon first installation I was getting a pad wear error. I believe this may have been caused by dirty connector pins or a pinched wire. Disconnected, sprayed the connectors with WD40 and re-routed the wire; all good. No errors.
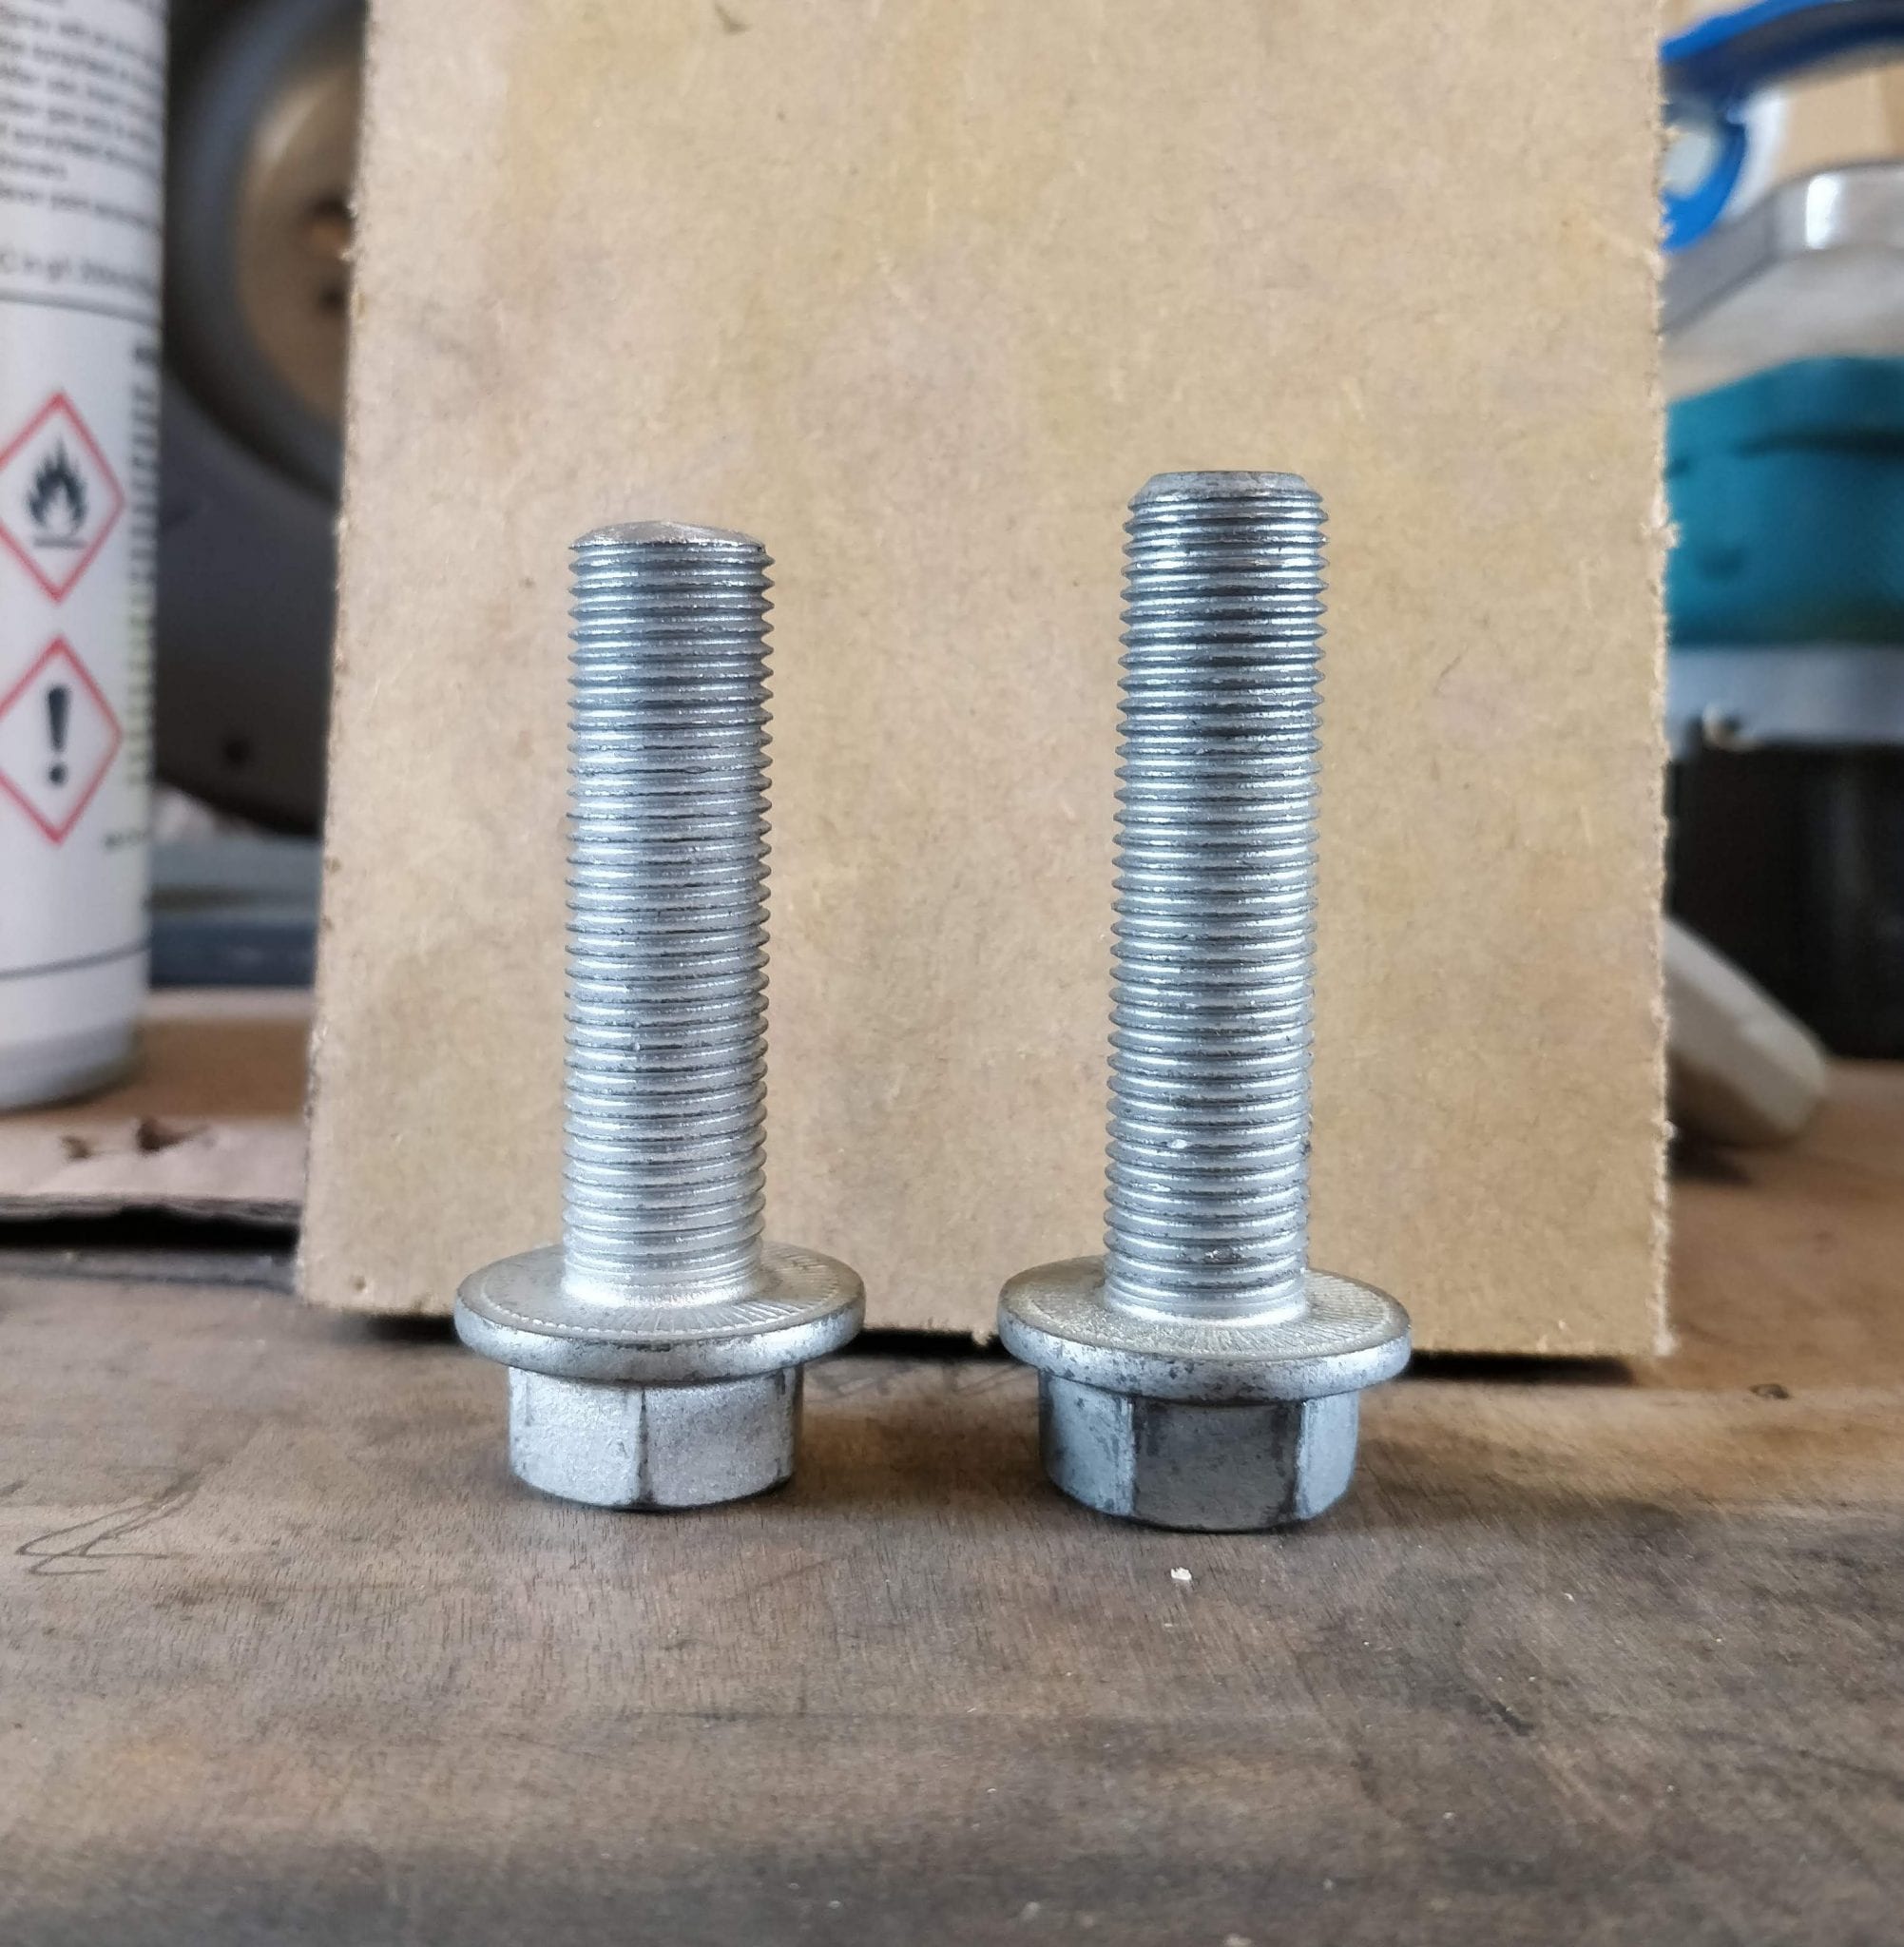
Audi/VW 17z/18z mounting bolts & locking nuts
The carriers for the standard A4 calipers are threaded themselves and the standard bolts screw into this tread, the 18z calipers do things a bit differently. The Brembos have smooth, unthreaded mounting holes, like the hub itself. This means two things, firstly the new bolts will need to be longer as you’ll be using a locking nut to secure them and secondly, shims are required to reduce the size of the caliper mounting holes and prevent any movement of the caliper on the new bolts. You can buy a bolt kit which includes everything you need for around £35. There were some cheaper kits around but for a good quality set that will last, £35 was reasonable.
I experimented a lot mounting everything up to the hub in various orders and could not get everything together with the bolt heads facing outwards, which would give the most clearance. In my case I found I had to mount everything up with the bolt heads facing inwards on the hub and screwing the 55mm bolts in they ended up fouling the disc. I shortened each bolt by about 4mm with the angle grinder and filed it smooth to get the clearance I needed.
Tools required for Brembo 18z installation on B6/B7 Audi A4/S4/RS4
Assuming you’ve read the post “Removing B6/B7 Audi A4/S4 front brakes” and already have your calipers unbolted and hanging up out of the way, knock off those tiny original discs and congratulations! It’s time to fit your new brakes!
Here’s the tools you need:
- 21mm socket (1/2 inch drive)
- ratchet (1/2 inch drive)
- adjustable spanner
- 11mm open-end spanner
- 14mm open-end spanner (depending on your new brake lines – HEL braided lines required 14mm)
Not essential but highly recommended:
- 11mm brake line spanner
- paper towels/rags
- brake/parts cleaner
- wire brush (to clean hub)
Brembo 18z installation guide
Before you start you might want to spray the nuts on your old brake lines with some penetrating fluid where they couple to the car’s hard lines so that can start working its magic while you’re fitting up the new calipers. Reapply throughout the process as you see fit. These cars are old, things are rusty and seized, that just how it is. Penetrating fluid is your friend.
Time to build up your new brakes!
The pads will slot into the rear of the caliper. Take the metal clip from your fitting kit, apply pressure and slide the retaining pin through. This won’t be easy, you might need to place the caliper down on some card to really apply pressure without scratching the caliper paint.
The retaining pin goes through the hole in caliper, over the top of the clip and back out through the caliper. The pin head has flat faces which seat against corresponding flat spots on the caliper, make sure you insert it the correct way around. Tighten the supplied bolt into the end of the pin to secure it in place. Your pads are now installed.
Fit your pad wear sensors. These will only fit into the pads one way around and simply slot into place. Route the sensor cable securely in place with the retainer built into the pad clip and the channel built into the caliper.
Lastly for the caliper build, screw your brake line into the caliper body. Be careful not to cross-thread; it should not feel tight until it is almost all the way in. There’s no need to really force this down tight and doing so could damage the threads and cause the line to not seal correctly. Secure it but don’t over-do it. With my HEL lines tightened all the way down I am still left with around 4mm thread exposed.
This probably a good time to check your bleed nipples are tightened down too. Just nip them tight enough to ensure they’re not open – leaky nipples are bad (ask you mum).
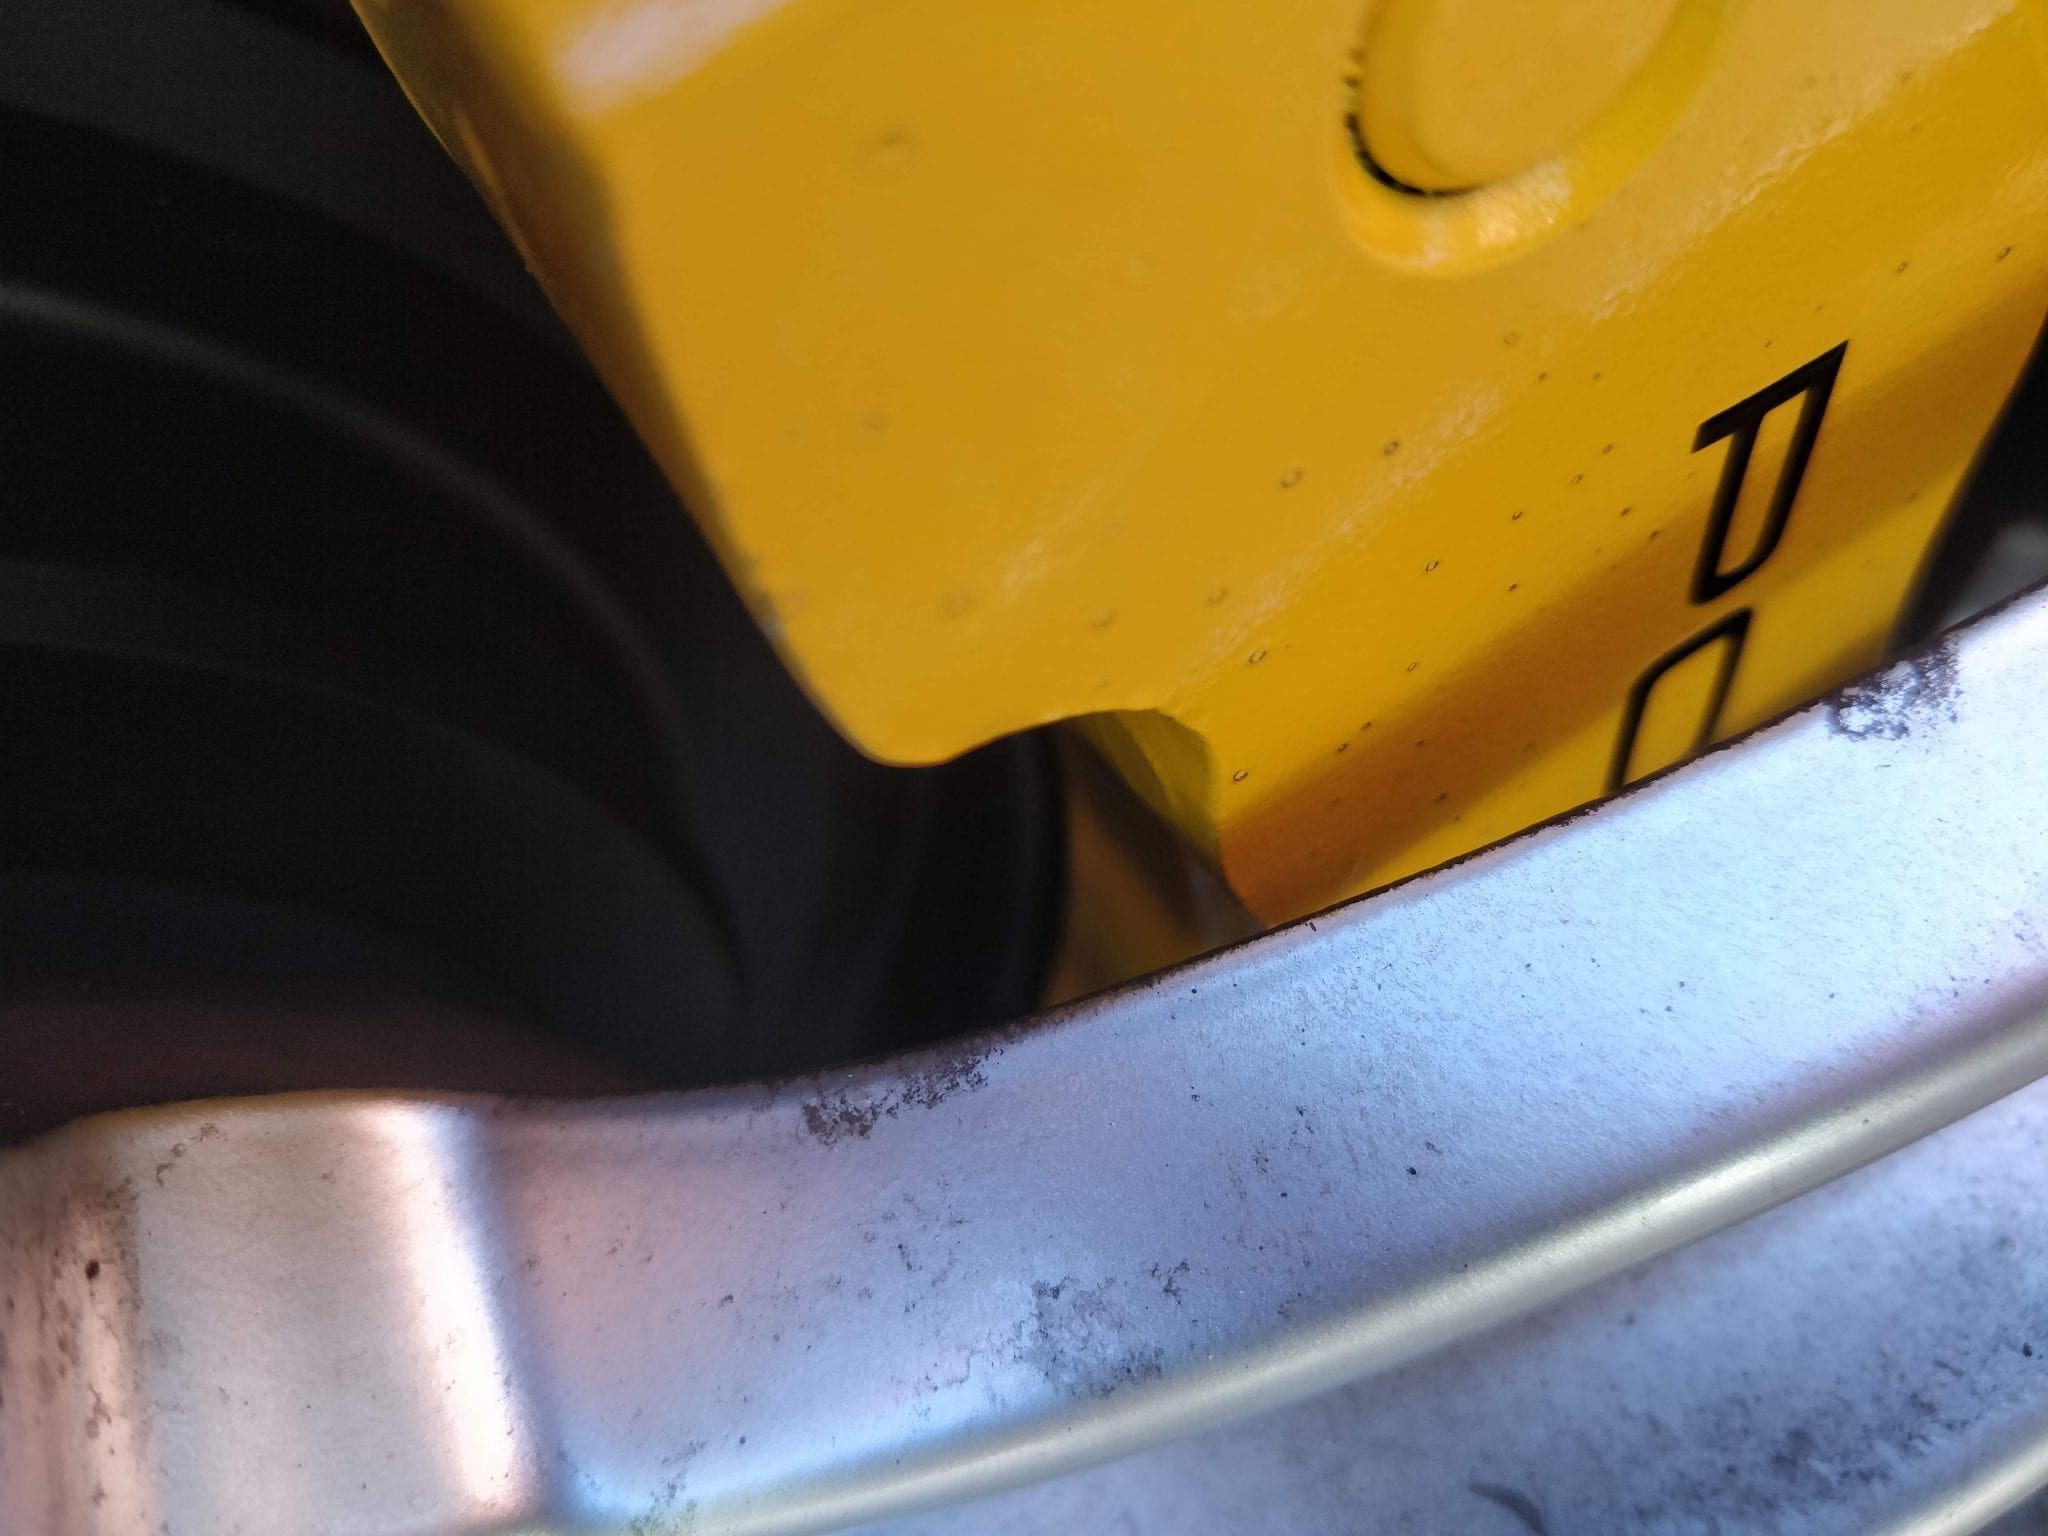
Here’s where you get to learn from my mistakes as at this point I wanted to fit up the caliper and see if the dust shields required any modification or if some spare B5 RS4 shields I had would work. What I actually found was that none of the sheilds fit correctly, even with some modification and that it was impossible to mount the disc with the caliper already in place.


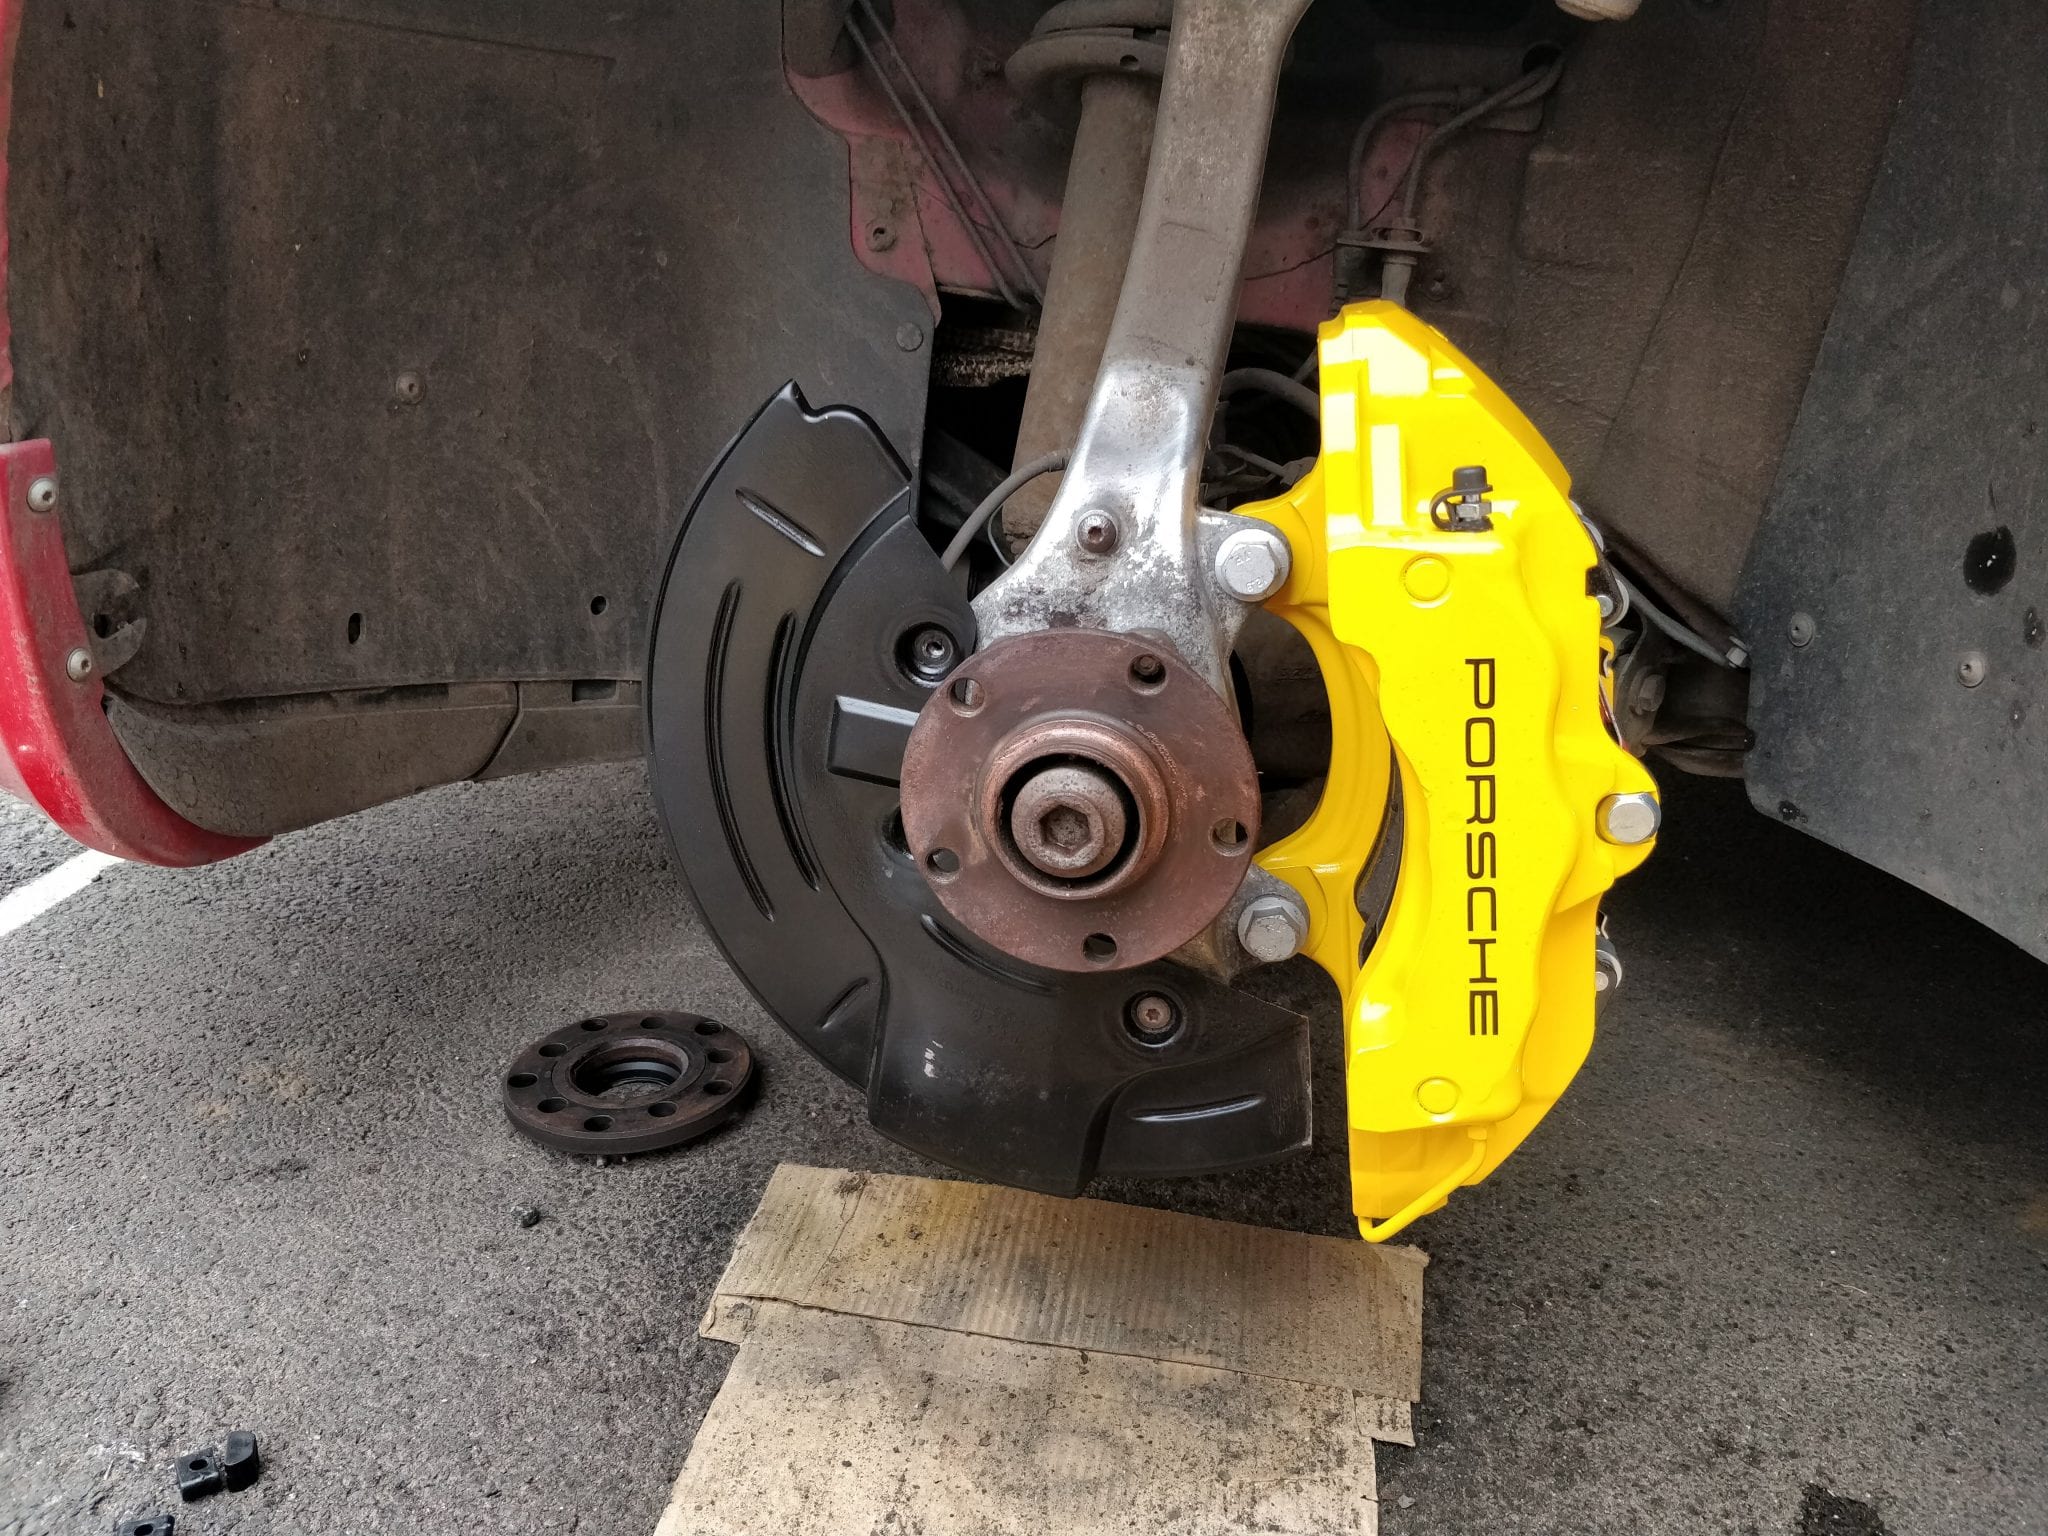
So with your caliper ready to go, place it to the side and prepare the hub for the new disc. Clean up your hub of any surface rust and grime (parts cleaner and a wire brush are great for this), now position your big new brake disc into place on the hub. If you find that it fouls your dust shield you can try and modify it to fit or just remove it – I removed it.
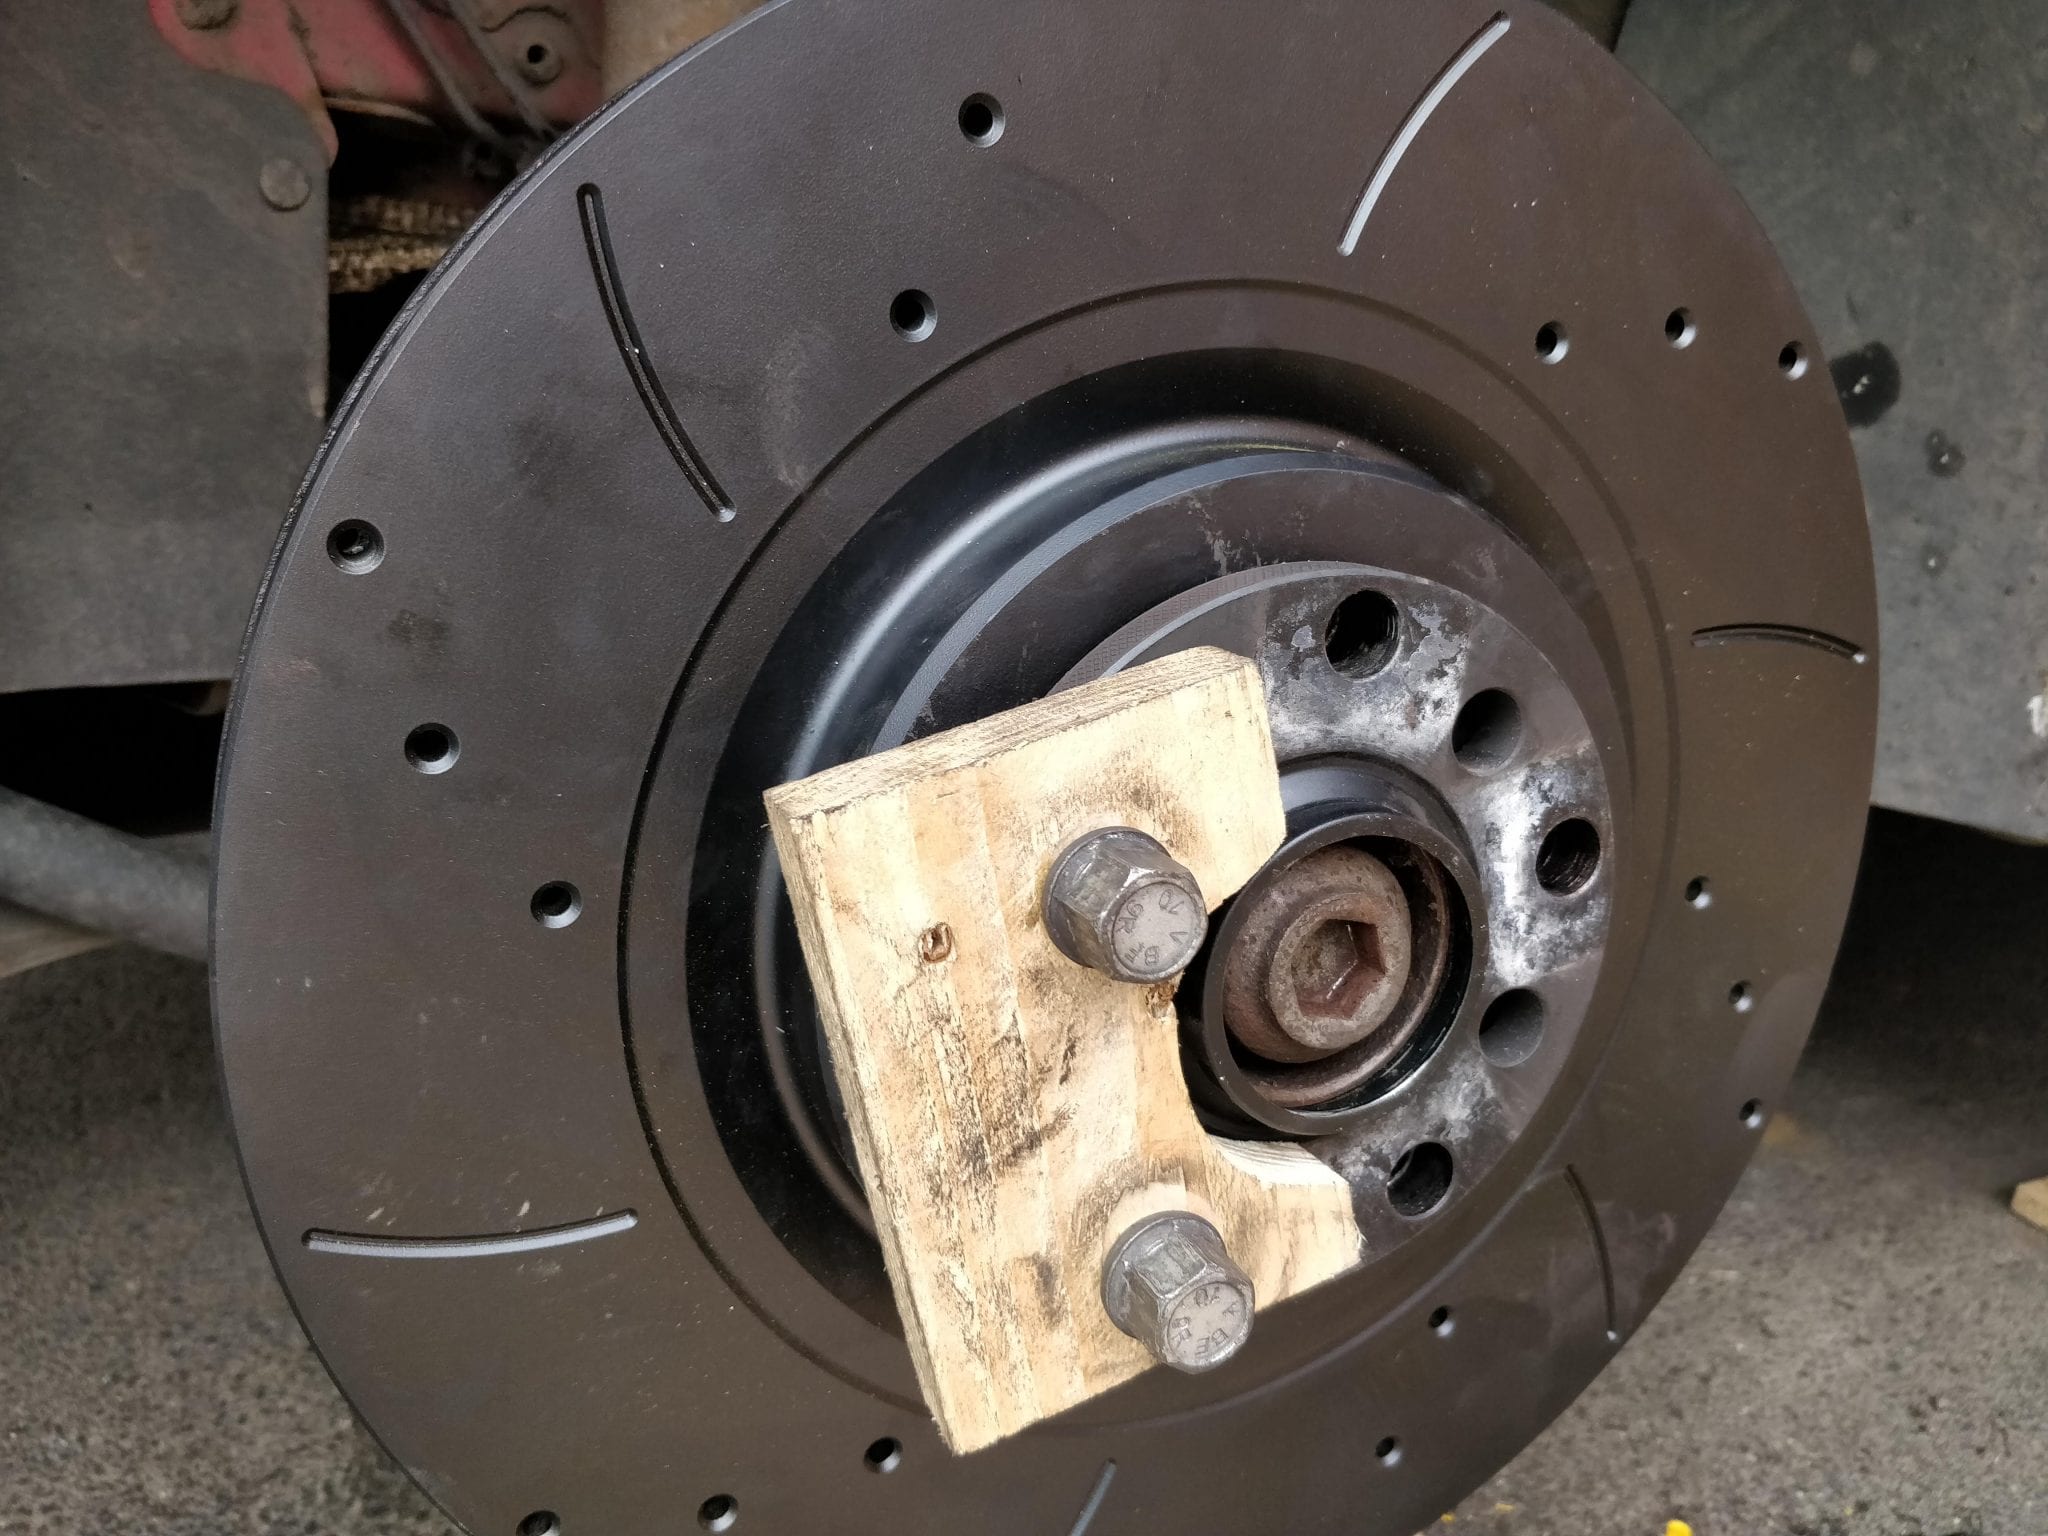
The disc will probably fall off if you don’t keep a hand on it, so throw a wheel bolt back in to keep it in place. I actually made myself an impressively ugly wooden spacer to hold the disc flush to the hub while I worked with the caliper.
Here you see the Mtec disc, an 8mm wheel spacer and my pallet wood “stop the disc from wobbling about” spacer. Now we install the caliper!
Forewarning: This can be a little awkward.
You’ll want to hold the caliper in place on the hub with one hand and try and push a bolt through one of the mounting holes from the inside, out with your free hand. You mustn’t push the bolt all the way though as you need to get the locking nut in place the opposite side. As long as you have pushed the bolt though the caliper and most of the way into the hub the caliper will hang on the bolt and you’ll have two hands free to continue the installation.
I found the easiest way to hold the nut was with an adjustable spanner gripped down tightly on the nut – this lets you hold the spanner upside down without the nut falling out like it would with a standard spanner.
Holding the nut in place, screw the bolt in with your 21mm socket and 1/2 inch drive ratchet. It will look something like this:
I believe the torque-spec on these caliper mounting bolts is “really f-ing tight.” You don’t want them to come off so summon the power of “Greyskull” and tighten them down like you’re He-Man. (Come back and check them in a couple of days just be be sure they’re good and tight).
You can either jump right into connecting up the brake lines at this point or mount up the opposite side and do both brake lines together. I decided to mount up the opposite side as at this point my old calipers were still connected and tucked out of the way and if anything didn’t go to plan I could still go back to little standard brakes without having to bleed anything. My recommendation is to mount up the other side.
So hopefully you now have both calipers fitted securely onto the hubs, over your new discs. It’s probably about time to hook the lines up then!
Before you disconnect the old lines, throw a wheel back on and check your clearances. Even with an 8mm spacer it’s pretty tight with these RS6 rep wheels.
When you disconnect a brake line you will want to work quickly but you don’t need to panic, without pedal pressure the fluid will only drip out very slowly leaving you plenty of time to reconnect your new line without making too much of a mess.
Wrap the lines in paper towel to catch the drips as the fluid is corrosive and will wreck the paint on your calipers and wheels if left to sit.
Make sure you have plenty of brake fluid in your reservoir, you do not want this to drop bellow the minimum level as you could introduce too much air into the system. Top it up and check the level after reconnecting each new line.
An 11mm brake line spanner is the perfect tool to disconnect the old rubber line from the car. A brake line spanner has a small opening to fit over the line but can then be turned to grip onto every face of the nut. A standard open ended 11m spanner can work but it has no ratchet action so it more difficult and doesn’t grip the nut as well.
I was doing this quickly so didn’t stop to take photos but I’ll go back and mock-up everything next time I have a wheel off to show you what you’ll be dealing with. For now, you’ll have to read and use your imagination.
Undo the brake line nut. I gripped the rubber line with some mole-grips to stop it turning with the nut. With the old rubber line disconnected, place the old caliper and line out of the way (fluid will leak from the line if you leave it upside down).
Flip around the 11mm brake line spanner and ratchet up the nut to the new braided line, you’ll have to hold the new line by hand to get it started. To tighten, grip the new line with an open ended spanner (14mm was required for my HEL lines).
Clean up and brake fluid spills and check the reservoir level. Top up if necessary any repeat the line installation for the opposite side.
Finally, secure any excess wear sensor cable with “cable” ties, it’s almost like they were made for this exact purpose!? The original wear sensor retaining bracket was part of the old caliper you just removed. I have heard the B7 RS4 bracket can be used but cannot confirm. Pretty confident cable ties are 100000% cheaper though.
If you leave the cables to flap around unsecured they WIL rub on your wheels and WILL fray and fail. Don’t risk it.
That’s the installation done, all that’s left is the bleed them. I’ll think I’ll do a separate post on brake bleeding, there are numerous ways it can be done but I like my cheap DIY method best – it deserves it’s own article.
Thanks for reading. If it helped you out, let me know in the comments, cheers.
// Matt
Got questions? Leave a comment. I only know the details of doing this on an A4/S4/RS4 but I’ll do my best.
Updates:
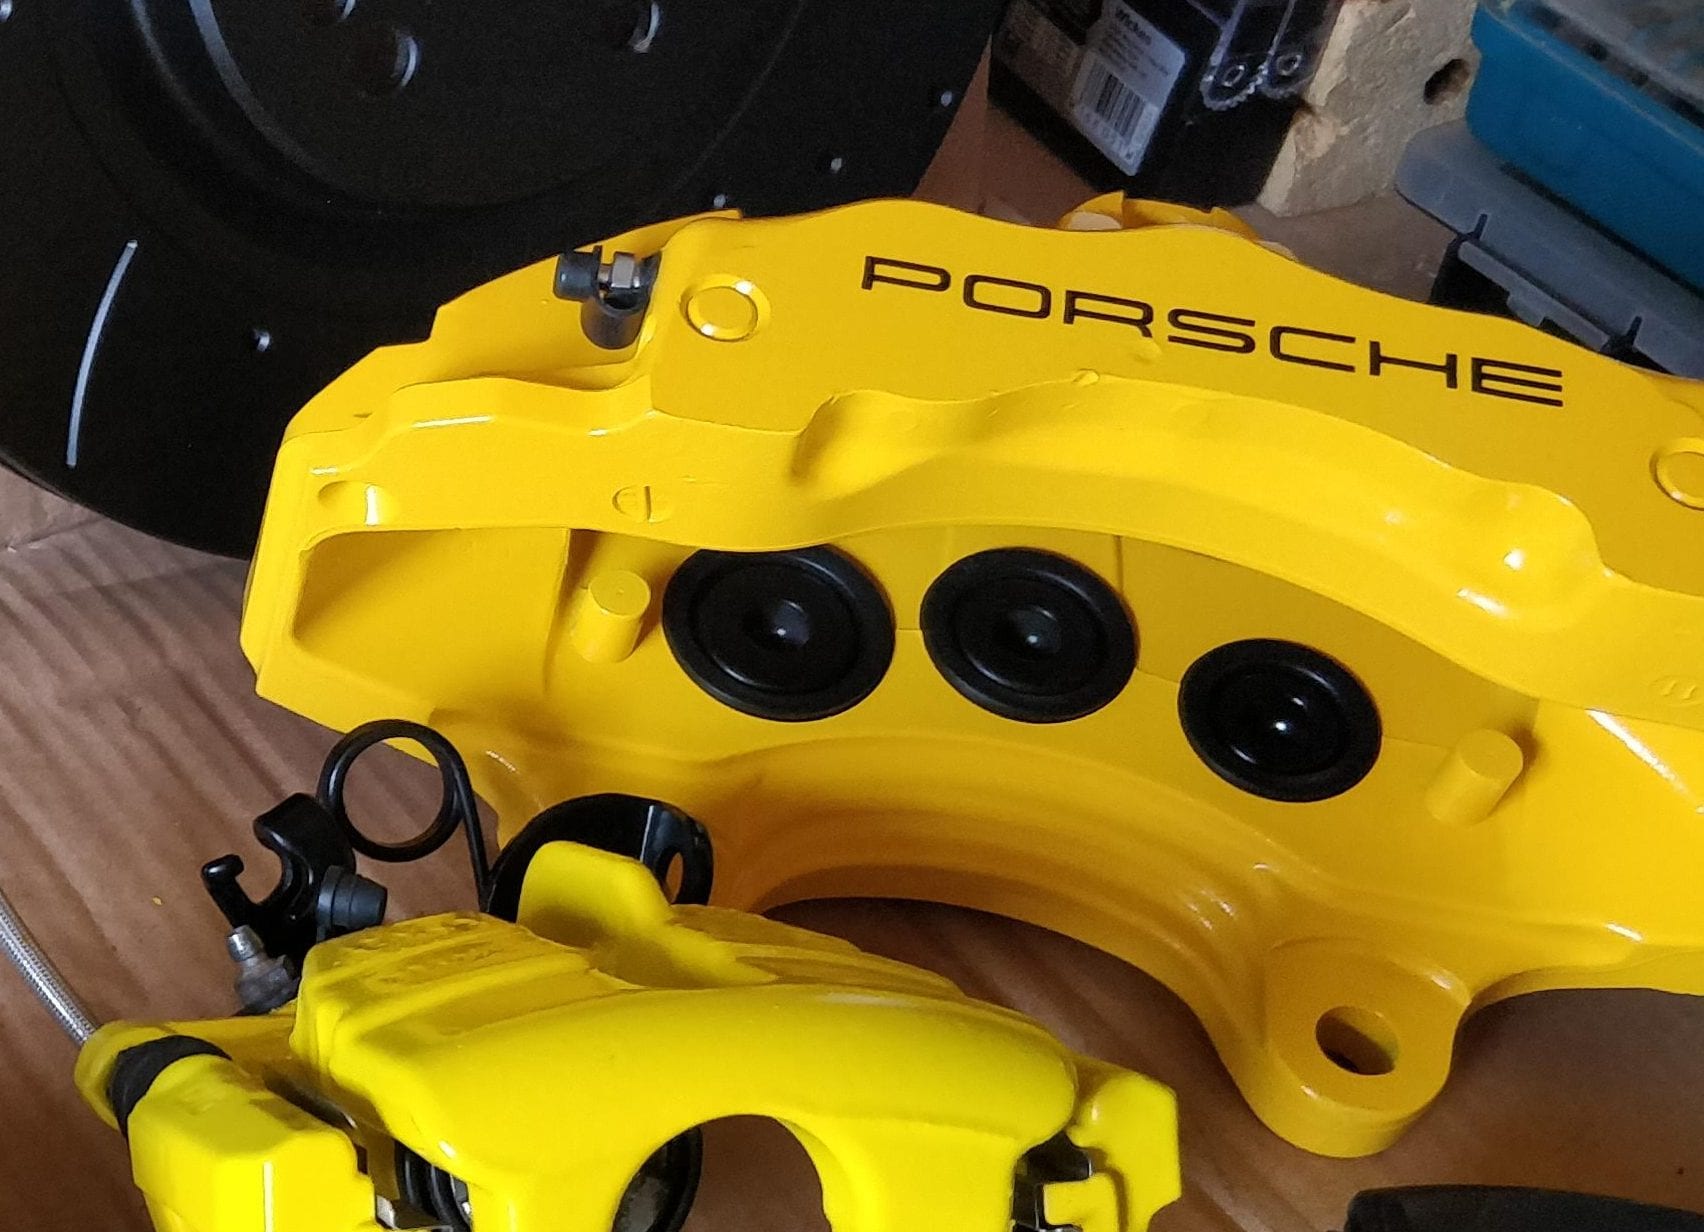
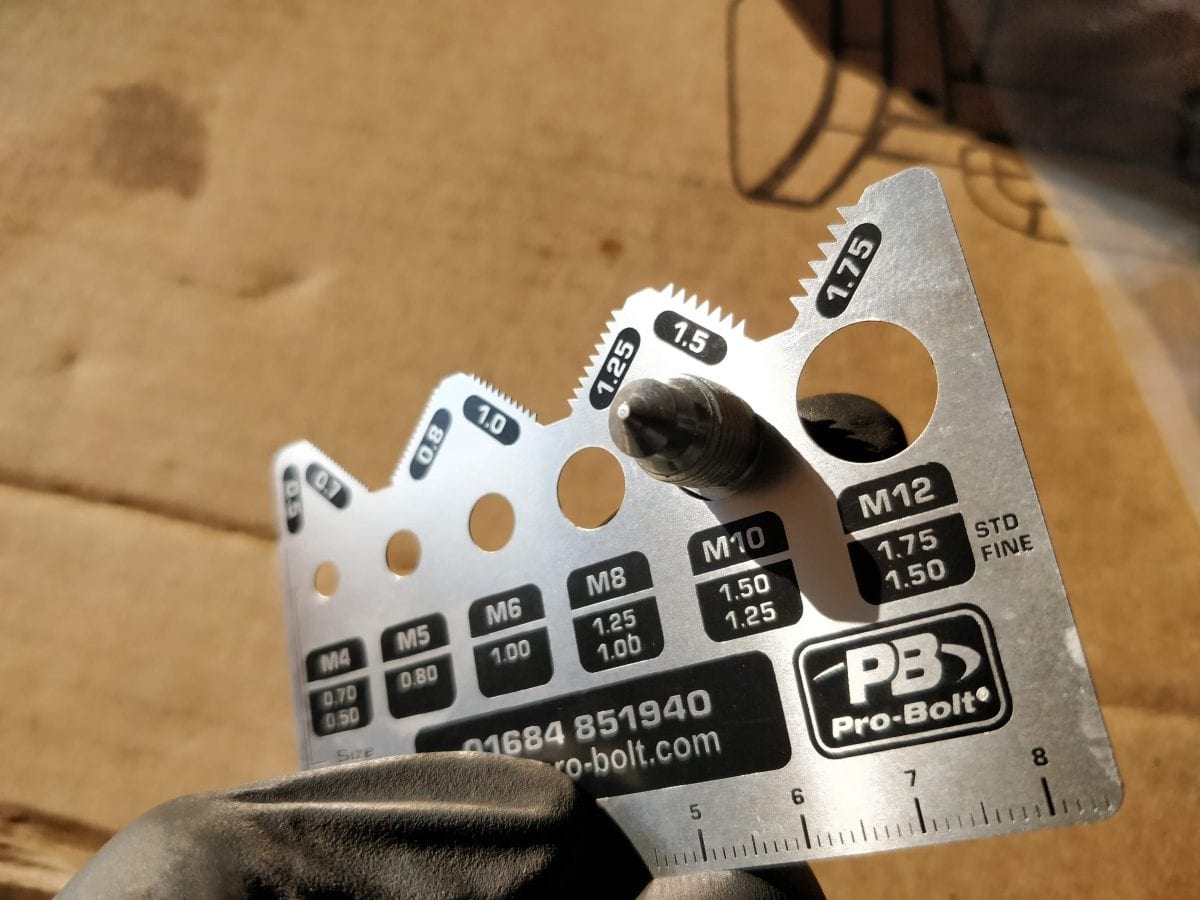
Andy Le wanted to know the spec of the bleed screws. I know my heads are 11mm but other than that I needed to measure one with my gauge from Pro-Bolt…
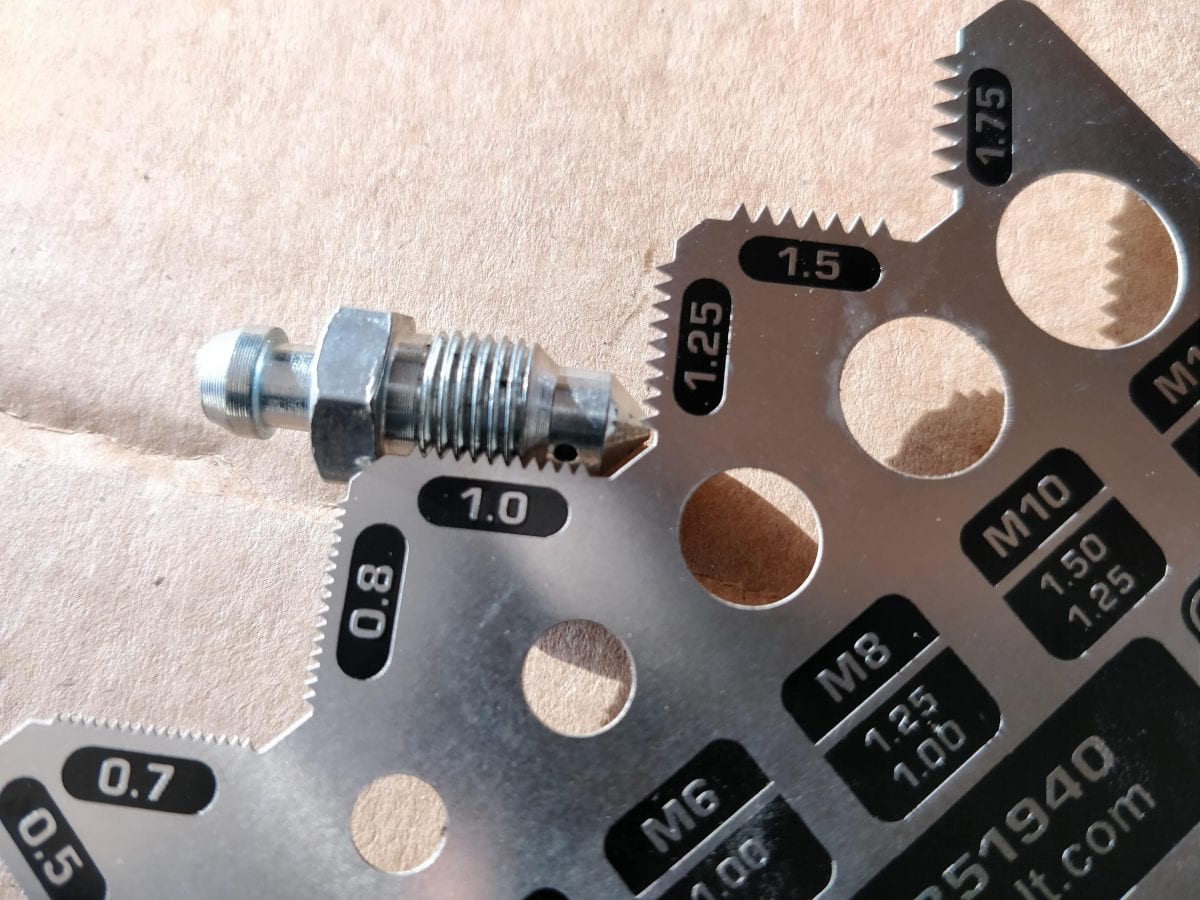
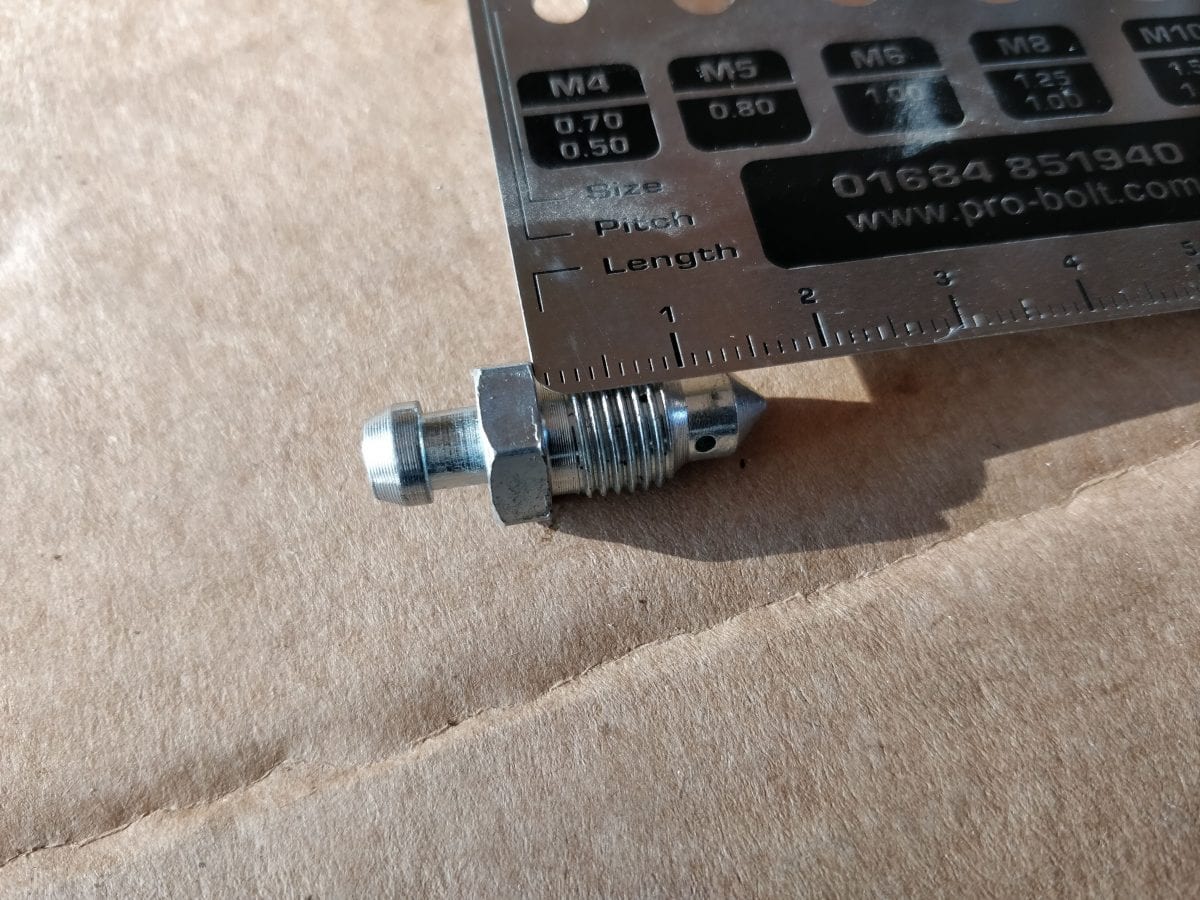
It had a touch excess wiggle room in the M10 hole but I think that’s because the M10 gauge is for 1.5 and 1.25 pitch threads and this was only 1mm. I’ve never in my life seen an M9 bleed screw so M10 seems most likely. Look at the photo and make your own mind up…
Hope that helps you out, Andy.
Hi ,
Out of curiosity , do you know what size are the bleeder screws ? I am in middle of rebuilding my calipers (18z) but I’m not sure what size are those for the bleeder screws.
Thanks,
Andy
Hi Andy, I have a spare 18z caliper so I went and took some measurements for you today. Looks like an M10x1.0x16mm. I’ve added some extra photos to the end of the post for you.
Hello, I have an a4 b6 1.8t quattro and I want to know if these brakes enter me without modifying any element. Thank you
Hi Antonio, Yes. If you get all the parts listed they will fit and work perfectly on your 1.8t.
Heyy I’m looking to buy Brembo 18z for my car i Have Audi A4 B6 1.8TQ 380hp i need to shop
You have a 380bhp 1.8T!? Awesome! Where can I check it out, Mario? You got it on Instagram?
Mark_no92 my instagram
I assume that original Cayenne 350mm rotors don’t fit on a B6. Can they be made to fit by spacing the rotor or caliper, or machining?
Hi Greg, The spec I found for the Cayenne discs is below but these are not my own measurements and so cannot confirm the accuracy.
Diameter: 350 mm
Overall height: 68,5 mm
Centre diameter: 85 mm
Stud holes: 5
Thickness: 34 mm
The Audi A4 bore diameter is 68mm so I believe this makes the centre bore of the Cayenne discs WAY too big for an Audi A4. There may be other dimensions that make them incompatible too (the wheel PCD could be different) I just don’t have the exact specs to compare.
If the only limiting factor is the centre bore then I guess it may be possible to whip up some sort of bore reduction spacer on a lathe but that’s not a solution I’d be comfortable with. I certainly wouldn’t be buying Cayenne discs and making spacers when I know the ML500s can be made to fit perfectly.
I suppose if you’ve managed to salvage the entire Cayenne brake setup, then you’d obviously rather use the discs and pads from that instead of buying everything new, I get that. “Risk vs reward” though, dude. We’re dealing with tight tolerances, exposure to heat/friction. How much would you bet an entirely untested, unproven disc bore spacer would perform? Your life? Someone else’s life?
If it were me in that situation I’d try and sell the Cayenne stuff I didn’t need to take the edge off the cost of new parts proven to fit and work correctly.
Yep, I discovered some of that stuff after asking the question. Not the way to go. How about using the 350mm Mercedes rotors, rather than the 345mm? The only thing different that I can see (other than the diameter) is that the hat is about 3.5mm taller. Mercedes W164, W166, W251 and X164 models all have 350mm rotors.
Hi mate,
Great write-up! I have a 2004 B6 S4 and wondering if wear sensors are common? Im in Australia and although my VW Touareg has wear sensors I have no lights on my dash to show when my brakes need replacing and right now ive been riding around with absolutey no meat left on my brakes!
Another question what is this improvement of going 18z over OEM S4 Calipers which take a 345mm rotor?
Hiya Simon,
Yea, wear sensors are pretty common, even my 1999 B5 A4 had wear sensors. When triggered the centre info screen on the dash lights up with an icon that looks like an old drum break (same location the low fuel icon appears). It also displays if your brake fluid gets low. Same for B5, B6 and B7 A4s.
You may find on other vehicles that rather than a dedicated brake pad light or screen notification, your handbrake light just stays illuminated. It is a brake warning light after all, just usually it’s only warning you not to drive off with your handbrake applied. Some manufacturers have been known to use them to warn of low fluid and pad wear too.
Another thing to look out for is if your wear sensors have been “bridged.” I’ve done this myself when I first embarked on DIY brake maintenance on my first car and bought pads without sensors by mistake. You can snip the sensor cable and plug off the old pads, join the wires together and plug it back into the car. The car thinks the pads are fine and no warnings are displayed. Not ideal as you then have to keep an eye on the pad level yourself but handy to get you out of a jam.
I’d really expect all Touaregs to have pad wear sensors, so it could be that someone had bridged your pad sensors without your knowledge, or maybe some other electrical fault.
I’ve not driven a B6 S4 with OEM brakes so can’t tell you the difference. I’ve run various brake setups on my B6s (1.8t and 3L V6) and this 18z setup is by far my favourite.
Previously the cars have run both B5 RS4 and B7 RS4 setups, so I can give some insight into how the 18z’s compare to those.
The B5 RS4 setup (with OEM 360mm discs) was very effective, a big improvement over the stock 1.8t brakes. Initial outlay wasn’t too bad but maintenance (replacement Audi discs and pads) was expensive and the calipers didn’t look especially cool, just big floating twin pots.
The B7 RS4 setup was epic, there’s no sugar coating it. Monster 365mm discs and 8-pot calipers, identical to the Lamborghini Gallardo. They perform better than than this 18z option and look absolutely amazing but were obscenely expensive both in initial outlay and ongoing maintenance. They were better in terms of brake performance (and looks) but far from ideal for a daily driven car with a penny pinching owner, like me (haha).
This 18z setup feels closer to the B7 RS4 setup than the B5 RS4 setup. Brake fade may come into play a little quicker with this than on the OEM B5 RS4 setup due to the reduced disc size but I’ve never pushed them hard enough to notice.
Passengers are genuinely shocked by the way my brake setup on the 3.0 V6 eradicates mph (it does have OEM B6 S4 rear brakes too). For me the 18z setup performs excellently in every way in need it to. I can’t imagine changing to anything else now.
Also! Your link to Q5 wear sensors shows a Left Axle sensor – do we need a different part number for RHS or just or 2 of the left sensors and they will work?
No, I don’t believe you need a specific RHS sensor. I bought two of those Q5 sensors listed and all went together fine on left and RHS. This could be because I’m just cable tying them to secure them rather than clipping into any OEM brackets.
(I’ve heard B7 RS4 brake sensor brackets can be used for a non-cable tie installation, which may then require specific LHS and RHS sensors to fit but I’m happy enough with cable ties).
Hi Matt,
Thanks for your replies so far, I am more than happy to use this identical set up as I am able to get a set of 2010 Audi Q7 18Z’s for a great price. With the rotors the only thing you suggest needs to be done is a slight increase of the centre bore by 1mm in total – are there any other adjustments required to any of the mounting holes or do they just bolt up?
Cheers
Simon
No worries at all, mate. I researched this setup on and off for over a year before I felt confident enough to start buying parts and fitting things up. Happy to save everyone else the trouble I went through.
The Merc. ML500 discs bolt straight up the Audi hubs without any modification other than the bore size. PCD is exactly the same.
Thanks again Matt,
Maybe Ill send you a few pics of the set up on my B6 S4 once i collect all the bits! Im tossing up whether to save a few bucks and just install ASAP or get them fully painted with Brembo decals added before i install?! Got too many other bills at the moment!
Hey Matt,
You mentioned you needed to shorten the 55mm Bolts by 4mm – are you measuring the threaded section only when you quote 55mm or is that the full dimension of the bolt incl bolt head? I just need to know what length bolts to buy and what the length of the threaded section is (so i dont have to bother cutting them). Also the sleeve/shim – im trying to find these what dimensions should i be looking for?
Sorry for this SUPER late reply Simon! I’m fairly sure I was measuring just the threaded length to be 55mm, that’s usually how you’d measure a bolt.
Given the bolt heads on mine took a 21mm socket, just eyeing up the side-by-side photo the full threaded bolt + head length appears much longer than just 55mm.
Sorry I don’t have a spare to actually measure for you, all mine are on the car.
Also, regarding the sleeves/shims. I don’t know the actual size. I bought the bolt kit that came with the sleeves included and everything fit up very nicely.
Whenever I next have a reason to remove the calipers I’ll take some more measurements and update the post.
What is the width from center of rotor to outside of caliper. I have 19×8.5 30 offset and am trying to find out if this set up will work. I am hitting the stock caliper so badly. would need about an 1″ space but this will look horrible on my car.
I love the write up! Thank you so much for taking the time and make it it possible! Question! Do you think it would be prudent to tap threats to those calipers and drill the carrier hole to match and use a bolt that would work instead of using a bolt with a locking nut? Have you have envy problems with the locking nut afterwards?
Thanks Victor! When I checked the bolts after a few days I did actually find that one of my locking nuts had come a little loose. After tightening it down they’ve all been solid for over a year. I think I had just forgotten to fully tighten that one down upon first installation rather than it working loose over those few days.
I wouldn’t want to modify the calipers themselves in any way. While a little awkward to install, the locking nuts do work very well so I’d definitely rather this than attempting to tap threads into the calipers.
I’m not generally opposed to modifying things either! But in this case, given the locking nut method is tried and tested I think the low cost and reliability outweighs any benefit you’d get from tapping the calipers.
Hi Matt,
Thank you very much for this write up! amazing!
2 Questions;
1) The link for the brake lines, is that for one line? so we need 2/4? or is that a kit of 4 lines?
2) What about the rear of your car? Are you running stock rear brakes? The reason I ask is are you running drilled slotted up front and stock in the rear? Does it look funny?
Please post pictures (front and rear too)
THANKS AGAIN
Hi Ross,
1) Yea, I bought 2 the same. I can’t really see how left and right would be any different. They appear to be interchangeable.
2) On the rear I have B6 S4 calipers (painted the same Porsche yellow) with standard sized B6 S4 discs, again, grooved and coated from Mtec, so they match the front.
I’ll find you a pic and tag you on insta.
Hello Matt,
1. Great work, really usefull.
2. It is nice that you reply on the comments even in 2021.
3. I have few guestions, can I?
a) have you considered Porsche Macan brake discs? 350×34, 68 mm bore, 112×5 bolt pattern and 52,4 overall hight.
b) would it fit in my 2002 Audi Allroad Quattro (A6 C5)? I have cast iron hubs (not sure if this is the correct word) but I can convert them info aluminium ones (S6 C5). Which should I choose?
c) sorry if I missed this, what rims do you have on this setup?
Thank you for the work and awsers.
Luca
Hi Matt,
Which parts will I need to do the 18z brake conversion on my Audi S3 8p?
Afraid I am not familiar with the 8P platform. I did all the research on this specifically for B5/B6/B7 chassis A4/S4/RS4 because they are the platforms I’ve owned and/or done big brake conversions on. The best I could do for you is take all the measurements I can off a spare 18z caliper. Let me know if that’d be useful and I’ll try and bump it up my to-do list for you.
Hello guys, first of all special thanks to Matt for all the afford and information, on my way building this setup found out CLA45 AMG are exactly like ML55amg just 350mm, means 5mm bigger than 345 from ML. But they are quite cool to loot and more performance on braking, also can fit porsche pads, im going to test them and send you the results, car is A4 B6 from Sportec with 220hp
Hey Matt, Great writeup, i just got a set of 18z with 370 RS3 rotors for my 629whp quattro B6 Avant 1.8t, have you heard of anyone making the 18z work with RS3 rotors on b6 platform ?
NicolasBresson20vt on insta if you wanna have a look 🙂