
The long-lost documentation has been found!
“WorldPay Business for WooCommerce” is an old plugin, last updated in 2016 but WorldPay seems to have not updated anything either and it still works perfectly, if configured correctly.
It’s still available from the WordPress plugin directory here: https://wordpress.org/plugins/business-worldpay-gateway-for-woocommerce/
The original documentation was published here: http://www.mdsdev.eu/mds-worldpay-woocommerce/ but the site has since disappeared and the original dev is not answering support queries on wordpress.org.
A couple of months back I had a WorldPay WooCommerce integration and rediscovered this plugin as I’d used it before. However, like you, I couldn’t find the documentation. With a shear stroke of luck I found an old note I’d saved on my Mac with all the documentation kept purely for safe keeping. It finally turned out to be useful!
Hopefully this helps you like it did me. And remember, the plugin has a donation button on the settings page so you can thank the dev if his plugin saved you purchasing an expensive annual plugin license.
WorldPay Business Gateway for WooCommerce
V1.0.0 March 2016
Author: MDSDev
Email: info@mdsdev.eu
WorldPay Business Gateway for Woocommerce
For the payment to be registered in your wordpress/woocommerce installation your urls have to be accessible, it won’t work in localhost installations or on any installation that has a plugin for “under construction” that blocks public access to the website and to routes.
To be able to accept payments trough WorldPay Business you must register an account here
WorldPay Business Gateway for Woocommerce is a WordPress plugin which allows you to accept payments on your Woocommerce store. Shoppers are redirected to WorldPay payment pages, and their payments are processed by WorldPay. Shoppers can pay with their credit/debit card. Available payment methods: Amex, Diners, ELV, JCB, Laser, Mastercard, Mastercard Debit, Maestro, Visa Card, Visa Delta, Visa Electron, Visa Purchasing, V.me by Visa.
The package contains:
- The plugin files.
- The required “Payment Pages” files (redirects the shopper back to the website when payment has been made or canceled).
- The optional custom design for “Payment Pages”.
This plugin will:
- Send to WorldPay the order payments in HTML
- Redirect a shopper from your website to the WorldPay payment pages
- Test your integration with WorldPay
- Customise your integration – by giving the payment pages a modern look
- Redirect a shopper back to your website if the payment is canceled or successful
- Make sure your integration is safe and secure
This plugin gives you control over all features supported by WorldPay:
- Logging: save plugin events into a file
- Test mode: to test your payment method before going live
- Payment Response Password: add the worldpay payment response password on the shop for an extra layer of security to prevent hacking.
- MD5 Secret: add the worldpay MD5 secret for hash encryption on the shop to prevent hacking.
- Signature Fields: build your custom ordered signature fields used in the MD5 encryption.
- Merchant Codes: add up to 3 merchant codes you would like payments to go through.
- Payment Page Billing Info: display the shopper billing information on payment page.
- Payment Page Delivery Info: display the shopper delivery information on payment page if shop shipping is enabled.
- Payment Page Fix Info: allow shopper to edit the billing and delivery information on payment page.
- Payment Page Hide Language Menu: allow shopper to change the language on payment page.
- Payment Page Language: select the payment pages default language
- Payment Page Hide Currency: allow shopper to change the payment currency on payment pages.
Plugin Installation
WorldPay Business Gateway for Woocommerce requires Woocommerce 2.1 or higher to be installed and activated.
This plugin installation doesn’t differ from any other WordPress plugin installation, so you might be familiar with this process already.
If you are not familiar with the process please fallow this instructions:
- Login into the admin area of your website
- Go to “Plugins” -> “Add New”
- Click “Upload Plugin” link at the top of the page
- Click “Browse” and navigate to the plugin’s zip file and choose that file.
- Click “Install Now” button
- Wait while plugin is uploaded to your server
- Click “Activate Plugin” button
Congratulations, the plugin was successfully installed!
WorldPay Account Installation Settings
To be able to accept payment trough your Business WorldPay account you will need edit the installation.
To edit the settings:
- Login into your WorldPay Business Manager account
- Go to “Setup” -> “Installations” -> Press the edit icons from “Integration Setup : TEST” and “Integration Setup : PRODUCTION”. You will need to edit both to be able to test first and after that to accept live payments. If you don’t want to test the payment edit only the “Production”.
Edit the Installation:
1. Copy: <wpdisplay item=CM_payment_response_url> in the “Payment Response URL” field.
2. Check the “Payment Response enabled?” box.
3. Check the “Enable Recurring Payment Response” box.
4. Check the “Enable the Shopper Response” box.
5. Add an email in “Payment Response failure email address” field to receive emails in case of failure.
6. Check the “Attach HTTP(s) Payment Message to the failure email?” box.
7. Optional: Add a Payment Response Password for an extra layert of security. This password will be know only by you and Worldpay and the plugin will check this password.Remember this password you will have to copy it into plugin settings!
8. Add the MD5 secret in the “MD5 secret for transactions” field and confirm it in the field next to him. Remember this secret you will have to copy it into plugin settings!
9. Copy your plugin generated signature fields (default: instId:amount:currency:cartId) into “SignatureFields” field.
10. Press “Save Changes” to finish setting up the Installation.
WorldPay Account Required Payment Pages
To be able to redirect the shopper back to your website 2 payment pages have to be installed into WorldPay account. The “resultY.html” -> the ‘Successful’ payment Result page and “resultC.html” -> the ‘Cancelled’ payment Result page.
The Payment Pages can be found in the plugin folder under “payment-pages” folder. Go to your wordpress installation folder -> wp-content -> plugins -> mds-worldpay-woocommerce -> payment-pages or download the plugin from wordpress.org extract the files and look for the folder “payment-pages”
To edit the settings:
- Login into your WorldPay Business Manager account
- Go to “Setup” -> “Installations” -> Press “Edit Payment Pages”
- Select the installation you want to edit the pages for and press “Edit Payment Pages”
Upload all the files from the “payment-pages” -> “required” folder located in the plugin folder:
- Press “File Management”
- Press “Choose file” and select one of the pages
- Press “Upload”
- Repeat with the other files
WorldPay Account Optional Design Payment Pages
Includes a custom design for the Payment Pages.
To edit the settings:
- Login into your WorldPay Business Manager account
- Go to “Setup” -> “Installations” -> Press “Edit Payment Pages”
- Select the installation you want to edit the pages for and press “Edit Payment Pages”
Upload all the files from the “payment-pages” -> “optional-design-pages” folder and it’s sub-folders(icons and logos). In the logos folder replace the “logo.png” file with your logo (rename your logo to “logo.png”) to brand the payment pages:
- Press “File Management”
- Press “Choose file” and select one file at a time
- Press “Upload”
- Repeat with the other files untill all have been uploaded
- When all files uploaded press “Button Images” and add the links to the new uploaded icons
- In “Continue & Select Language” field add “~/proceed.png”
- In “Cancel” field add “~/cancel.png”
- In “Start Again” field add “~/startagain.png”
- In “Help” field add “~/help.png”
- In “Make Payment” field add “~/makepayment.png”
- When all the above changes have been made press “Set Images” to save
The final result
Plugin Settings
To be able to accept payment trough your Business WorldPay account you will need the “Installation Id” from your Wordplay Account.
To edit the settings of the plugin:
- Login into the admin area of your website
- Go to “Woocommerce” -> “Settings” -> “Checkout” tab -> “WorldPay Business”
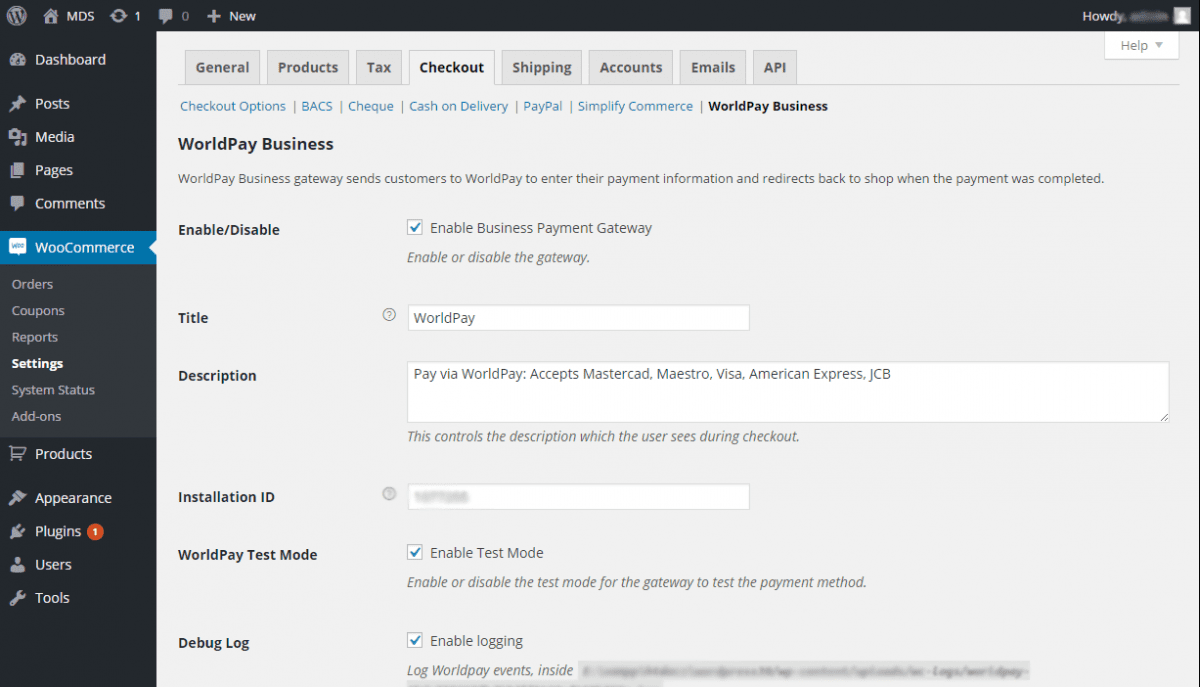
Available Settings:
1. Check the box to enable the plugin for use and shoppers to be able to make the payment trough WorldPay gateway.
2. Add the title that the shoppers will see on the checkout page when selecting the payment method.
3. Add the description that the shoppers will see on the checkout page when selecting the payment method.
4. Add the “Installation Id” from your WorldPay account. Without the id you won’t be able to get payments trough the gateway. You can find the “Installation Id” going to “Setup” -> “Installations” in your WorldPay account.
5 Check the box to enable the test mode for WorldPay gateway. After you install the plugin it’s recommended to test the payment before going live.
6. Check the box to enable logging. Every action made by users it will be saved into a file on your WordPress installation. You will find the path to the file under the checkbox.
7. Add the Payment Response Password you set up in your WorldPay account. This add an extra layer of security for your transactions.
8. Add the MD5 secret you set up in your WorldPay account. This secures the payment method and won’t allow hackers to hijack the value before sending them to WorldPay payment page
9. Select the signature fields and the order you want to use to generate the md5 hash
10. Copy the text into your WorldPay account if you are using the MD5 security. Go to “Setup” -> “Installations” -> Press edit “Installation Setup” icon -> Copy the text into “SignatureFields” at the bottom of page
11. Add your merchant codes. This parameters will enable you to select which merchant code you would like payments to go through. You can add a total of three different ones.
12. Check the box to hide the shopper billing information on payment page
13. Check the box to display the shopper delivery information on payment page if shop shipping is enabled
14. Check the box to not allow the shopper to edit the billing and delivery information on payment page
15. Check the box to not allow shopper to change the language on payment page
16. Select the default language the payment pages will be in when the shopper gets redirects to them
17. Check the box to not allow shopper to change the payment currency.
Thanks, much appreciated!
This was massively helpful. Thank you for taking the time to write it up
This plugin has been closed as of June 23, 2020 and is not available for download. This closure is temporary, pending a full review.